I don’t have a card to share with you today, I am spending the day at the lake while my son sails. And while he is, I am enjoying nature, listening to the beautiful Bellbirds, and enjoying this view.
And also playing with colour with some new images. I’m not sure what I will make with this yet but I will share the finished project soon.
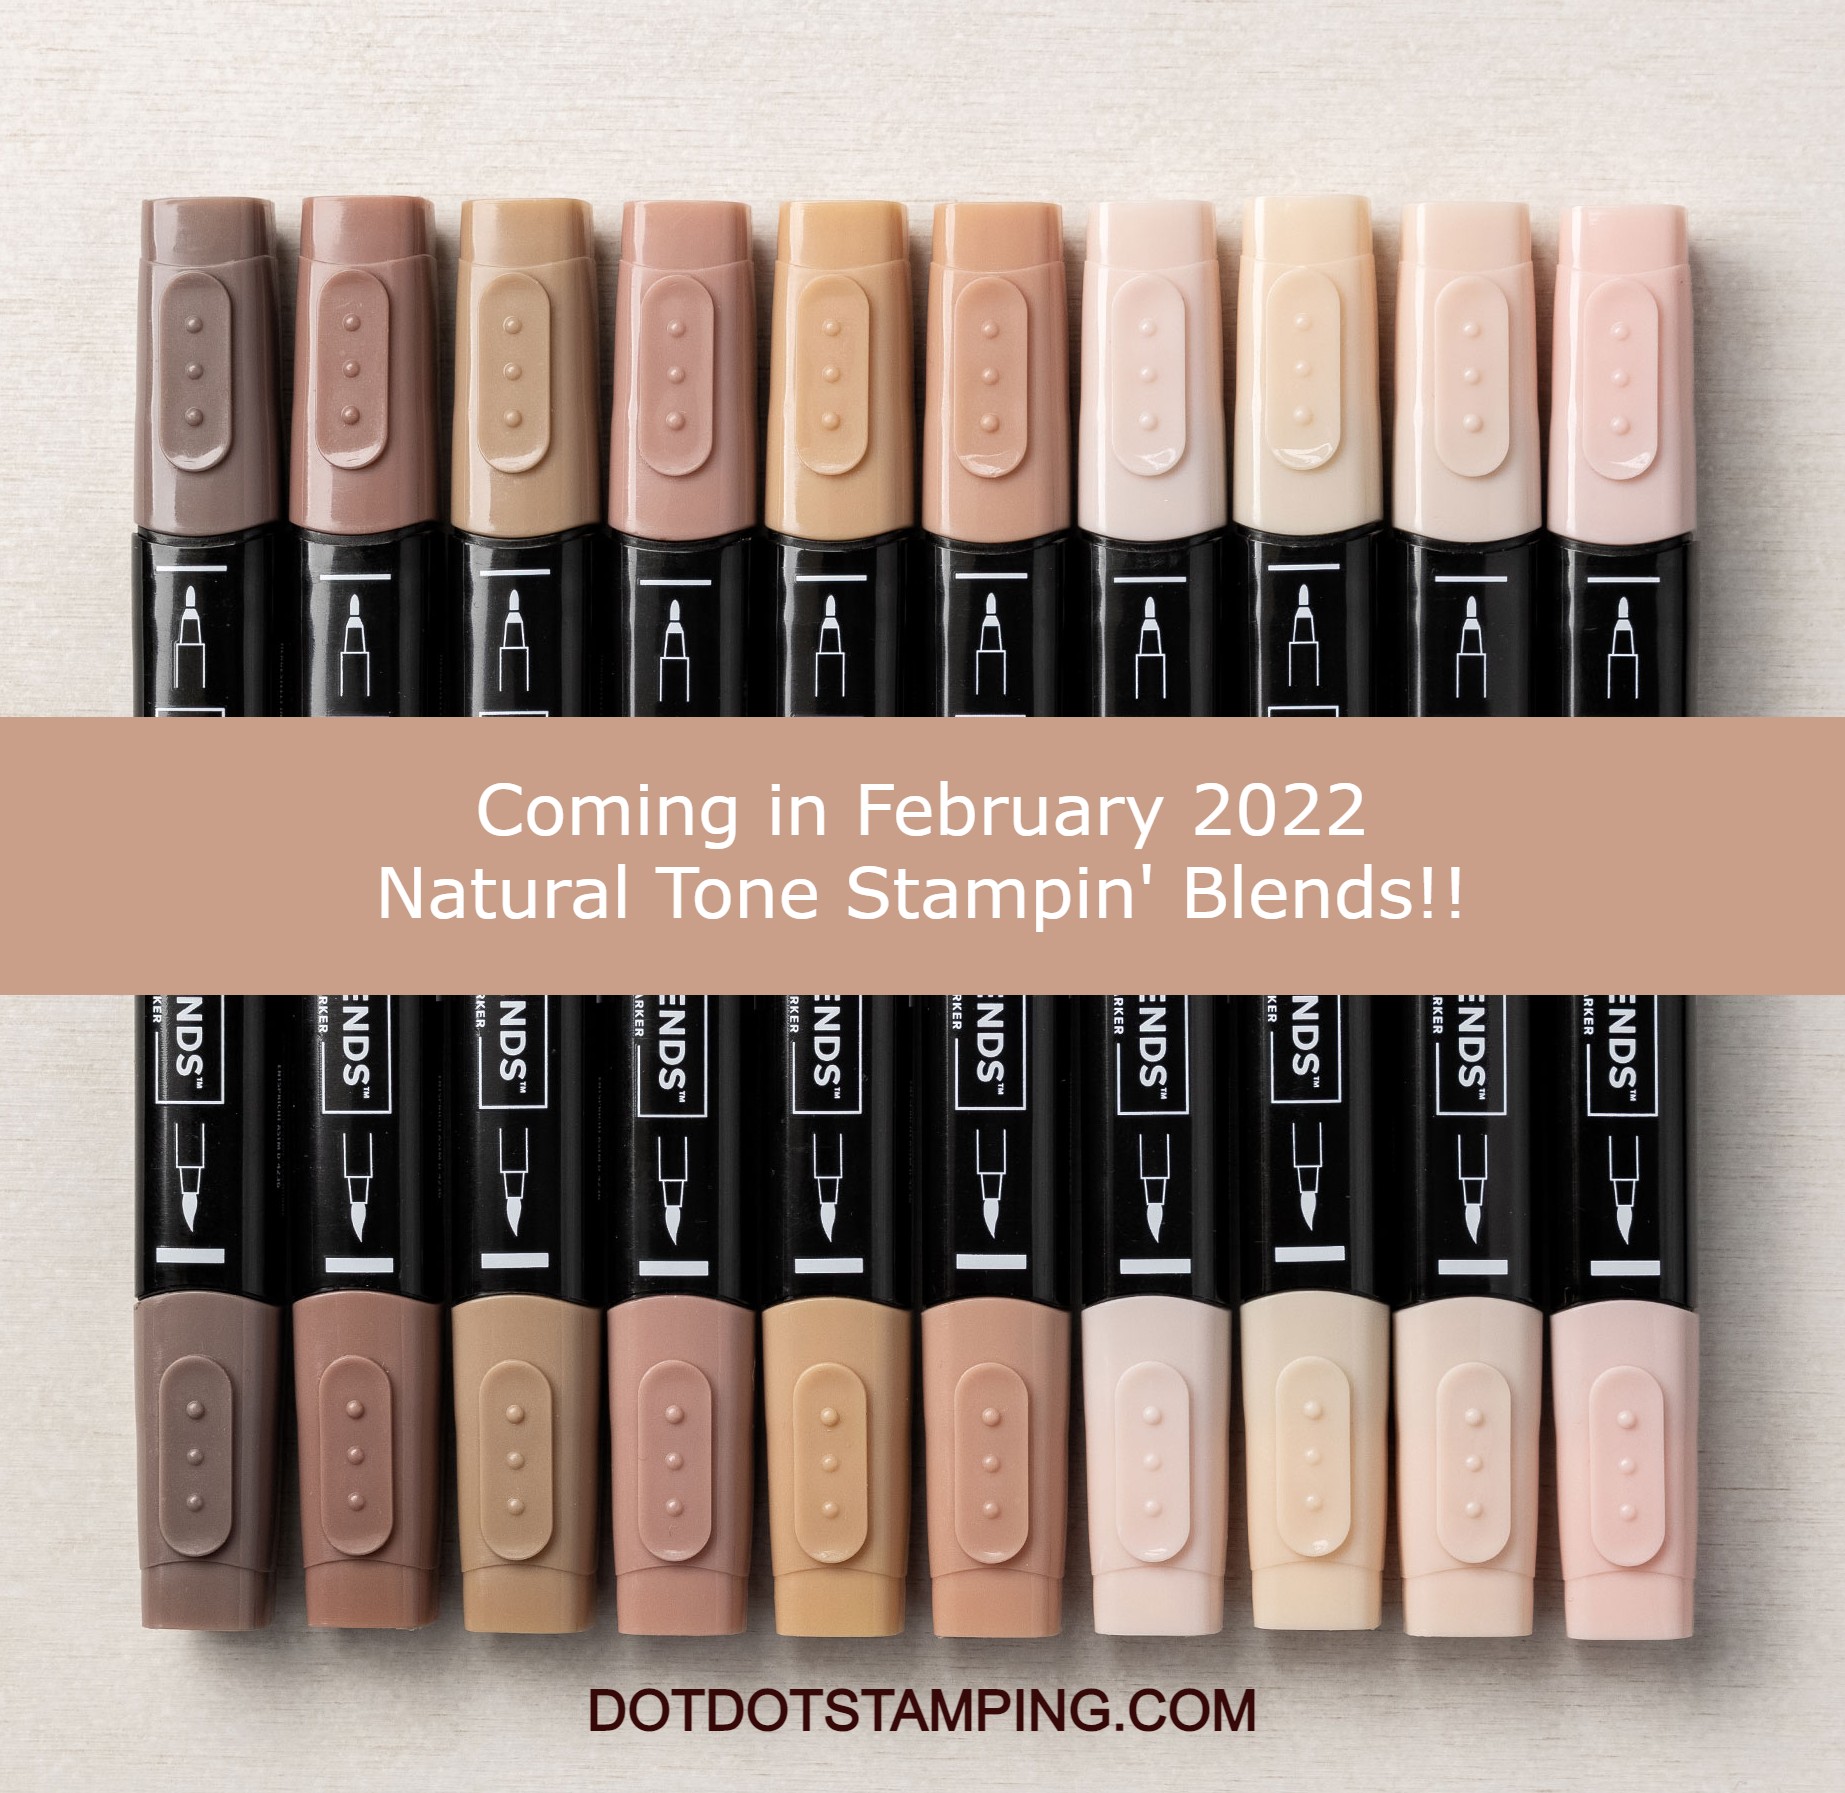
I am sharing a bit of a sneak peek today of a new product which will be available from 1st Feb 2022. The new Natural Tone Stampin’ Blends!
These will be fantastic for skin tones as well as for animals and, well…. just a great addition to current collection of colours. They are available as a preorder for demonstrators right now, so if you are interested in getting these now and would like to get a minimum of 20% off your craft purchases, contact me, or you can join here. These will be available from my online store from the 1st Feb 2022 – start planning your projects!
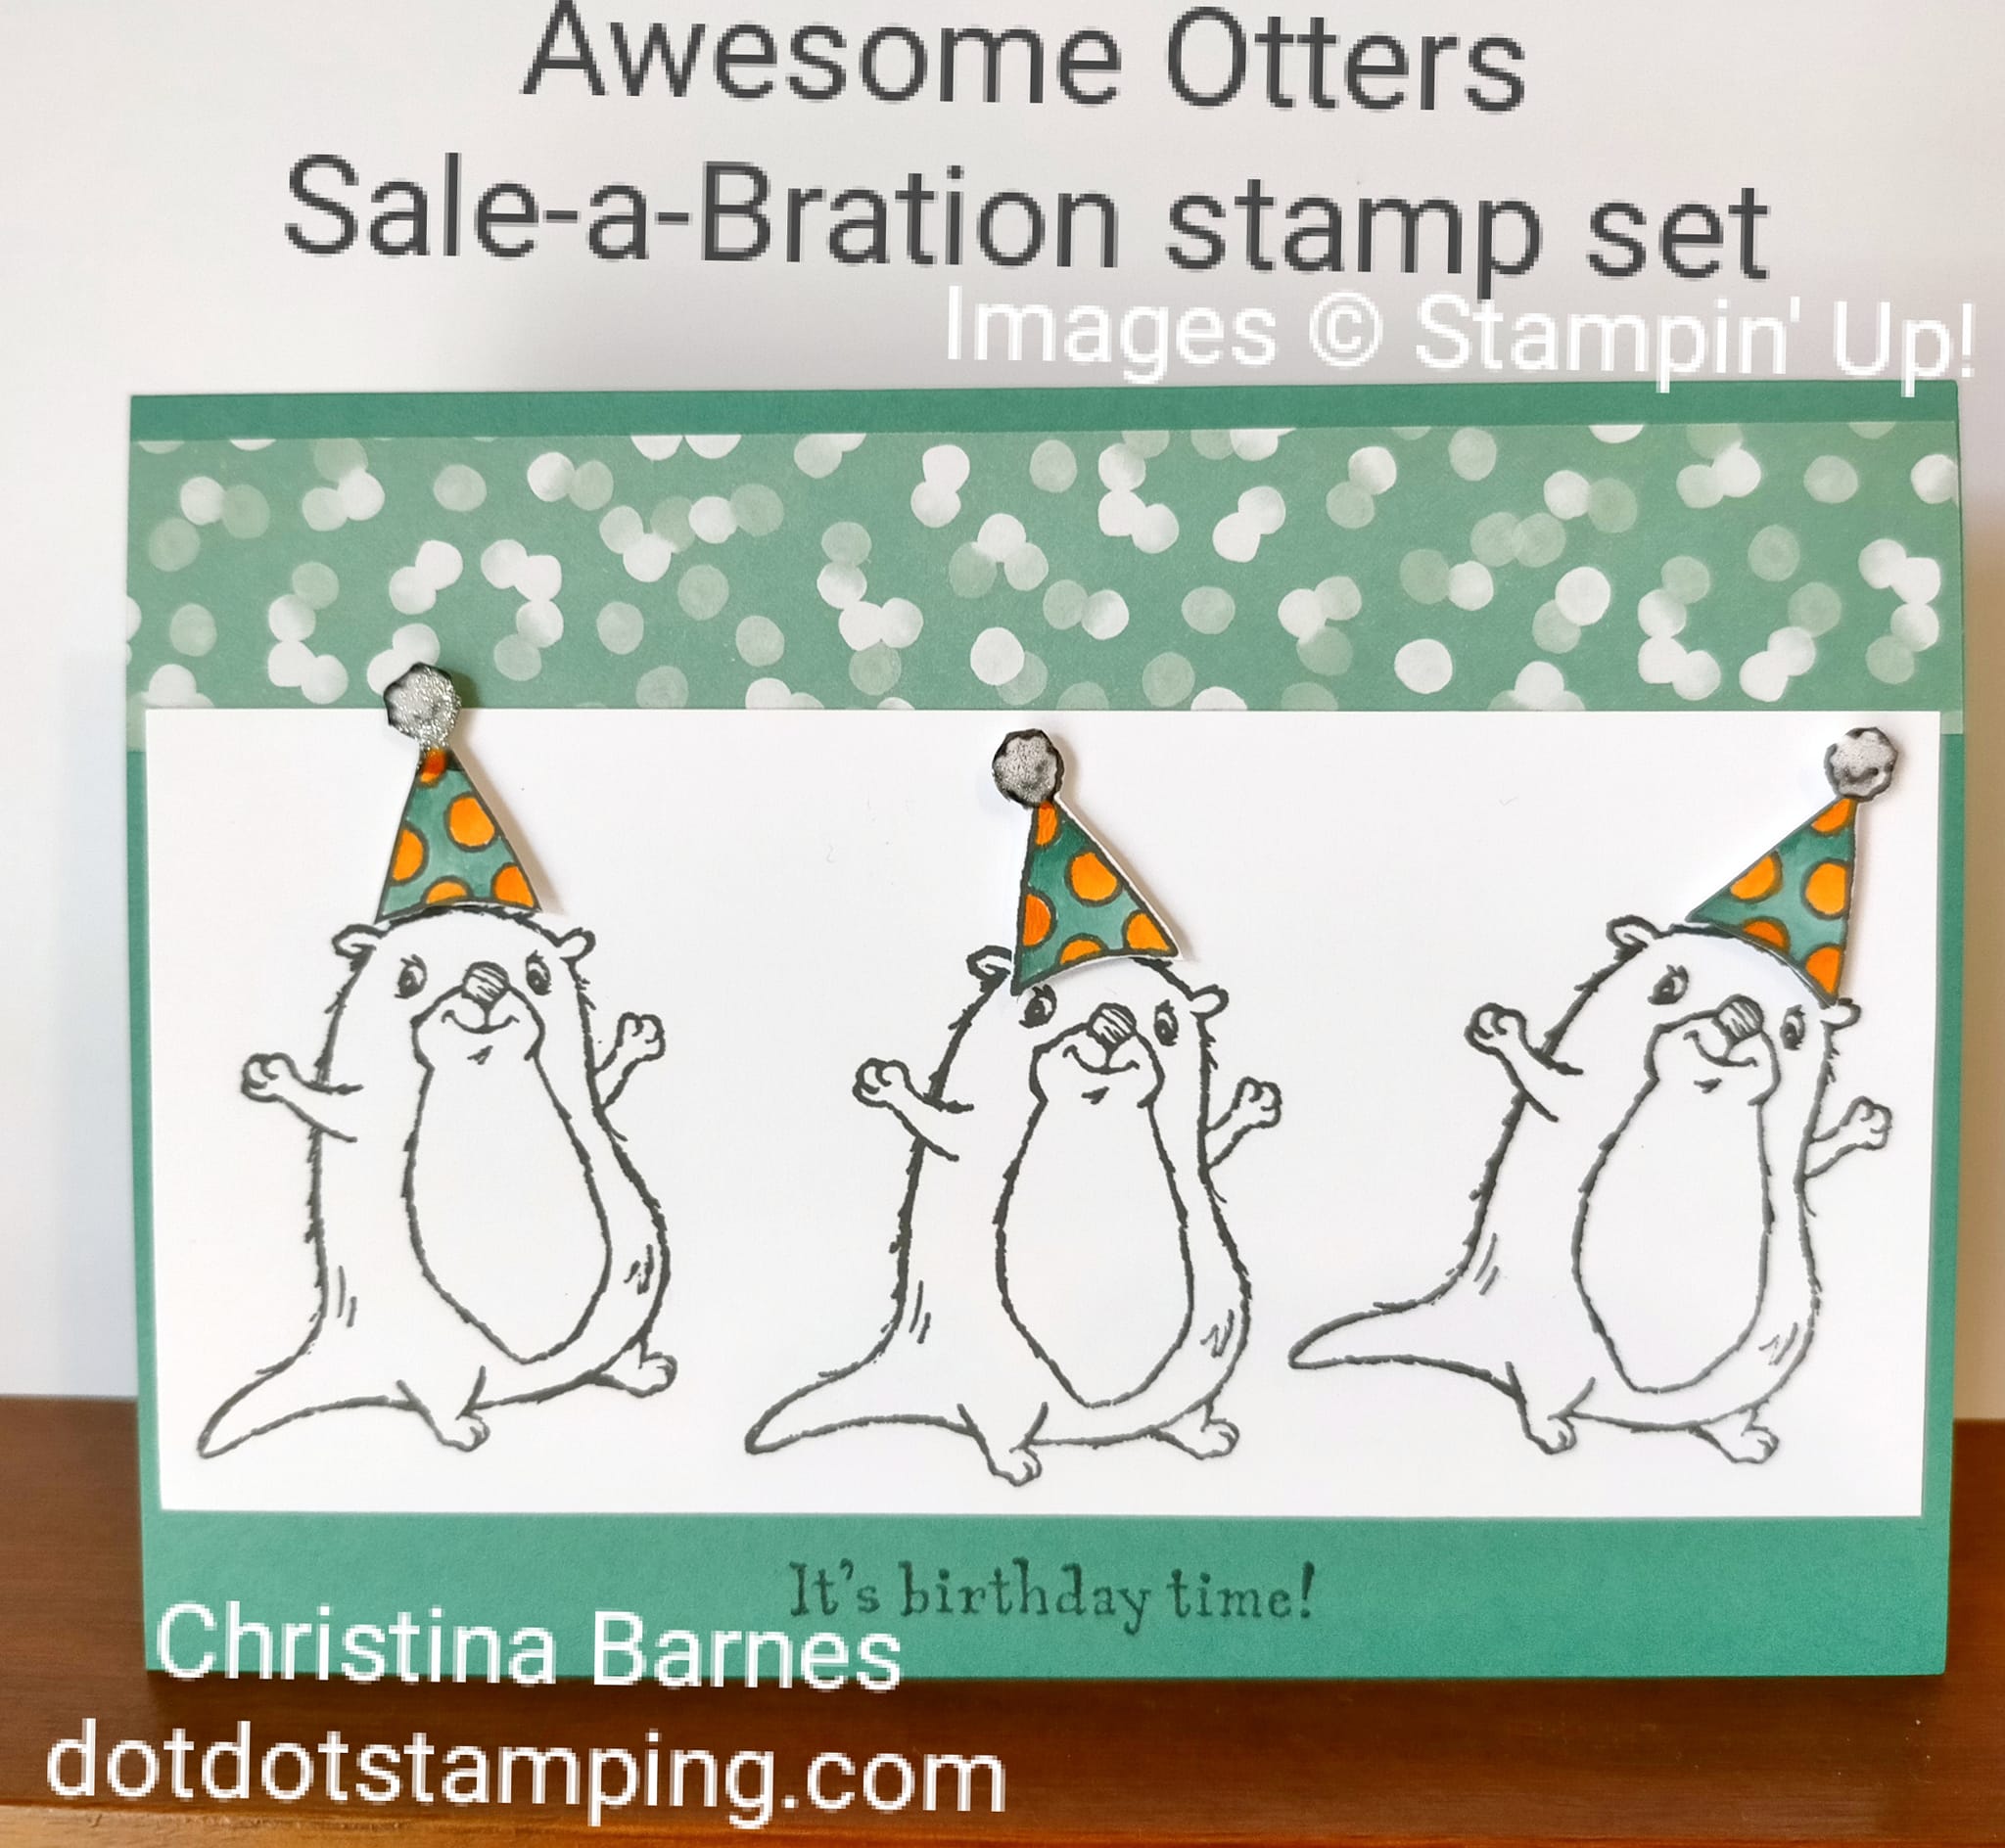
The Awesome Otters Sale-a-Bration set is just so cute that I had to make another card with it today, this time combined with some of the gorgeous Abstract Beauty Designer Series Paper from the new Mini catalogue.
They look like they are having a lot of fun! The hats have been stamped separately in Basic Gray and then coloured very quickly using a Blender Pen with Just Jade and Pumpkin Pie ink, and then fussy cut with scissors and adhered with dimensionals. There is some Wink of Stellar on the pompoms. And don’t forget to decorate the inside as well…..
I hope they give you something to smile about today! Happy stamping Chris
Use this host code when you order, and if you order $50 or greater you will receive a free gift from me! If your order is $250 or over, please do not use this code, you’ll still get a free gift – your choice of any item valued up to 10% or your order (excluding shipping costs) from the 2021-22 Annual Catalogue or July-December 2021 Mini Catalogue! That includes some of the Host Exclusive items. (Australian orders only please).
***Make sure that you can see my name on the final checkout page listed as your Demonstrator when you order so that you know that you’re ordering with me and you’ll get my rewards!
I have used the Stampin’ Up! Happy Holly-Days stamp set to make a masculine birthday card today, and since today is the first day of 2022, and I am sorting through my stamp sets and taking out the ones that are retiring, I thought I would give my favourites one last inking. Then I realised that I really liked all of the sets that I chose to buy from the retiring catalogue, in fact I will be quite sad to see them go.
I have coloured the bird with the Stampin’ Up! Watercolour Pencils, and while he looks grey in the photos, there is quite a lot of brown in there in real life, so he matches the background a lot better. After colouring the bird, I fussy cut so that I could mount it directly onto the Cork. Not only have I used my favourite image from this catalogue but also some of my favourite DSP, the Blackberry Beauty Designer Series Paper and also the Cork Specialty Paper. I have added a little sneak peek at one of the new stamp sets that I am already having some fun with. Did you recognise the layout? Page 67 of the retiring Mini Catalogue at the bottom right, featuring this same stamp set as a Christmas card. Well, here’s to 2022. Out with the old and in with the new!! I hope you are ready for it, I know I am. Happy stamping! Chris
Use this host code when you order, and if you order $50 or greater you will receive a free gift from me! If your order is $250 or over, please do not use this code, you’ll still get a free gift – your choice of any item valued up to 10% or your order (excluding shipping costs) from the 2021-22 Annual Catalogue or July-December 2021 Mini Catalogue! That includes some of the Host Exclusive items. (Australian orders only please).
***Make sure that you can see my name on the final checkout page listed as your Demonstrator when you order so that you know that you’re ordering with me and you’ll get my rewards!
A quick post today to share a giggle… This is the card I made for my son for Christmas. Since he loves to sail, it had to have sailing boats included….
We have three cats, a big part of our family, who we both adore, so the kitty faces from Sweet Little Stockings was another obvious choice. Combine the two things and our three rascal cats are sailing with their Santa hats on. I had some fun creating this one.
The proportions are not quite right but its pretty cute anyway.
In the background, the water is the new Gentle Waves background stamp, and the boats from the Let’s Set Sail stamp set and matching punch, all available from the 4th January 2022 in the new Mini Catalogue.
The kitties and their hats were coloured with the Stampin’ Up! Watercolour pencils.
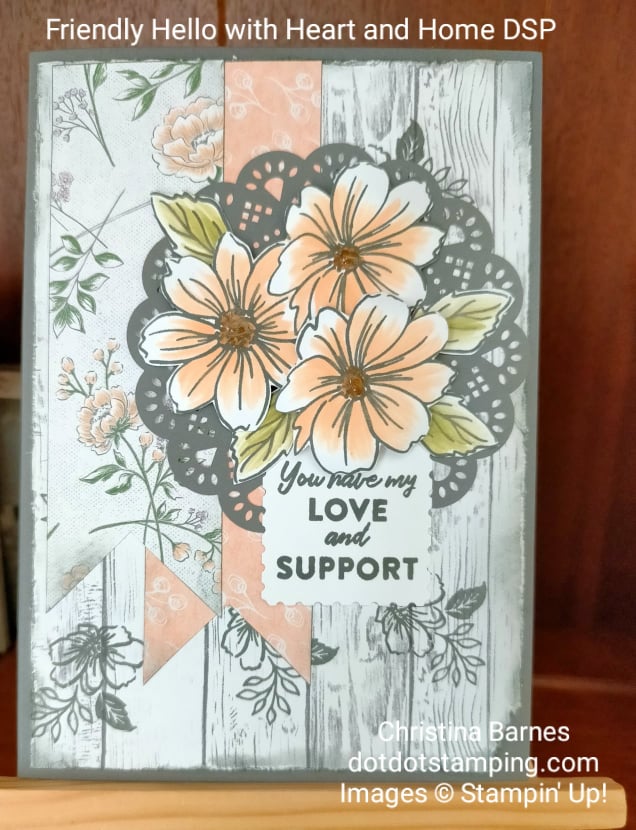
As I am sure you can tell, I just love the Friendly Hello Sale-a-Bration stamp set (available 4th January 2022), I am also loving the Heart and Home Suite (also available 4th January from the new Mini Catalogue) – yes, there is a lot to look forward to with all the gorgeous new goodies coming soon.
I made this card during my regular Wednesday morning Facebook Live, I have to admit though, I was very tired and probably sounded it. However I think the card turned out ok. This is a style I love to make, I know it’s not everyone’s cup of tea but it is easy enough to adjust it to be less “fussy” and appeal to a wider range of people. The gorgeous flowers from the Friendly Hello set, have been stamped in Basic Gray and then coloured with Pale Papaya ink and Blender Pens. And that gorgeous Basic Gray doily is part of the Heart and Home suite. Did you know that you can watch most of my Facebook Lives on my YouTube channel? Make sure you hit the subscribe button to get regular updates. Click here to go straight to my youTube Channel. I’m not sure about you, but I am looking forward to some holiday time and some down time to connect with some creativity and have a play with some new products and ideas. Happy stamping! Chris
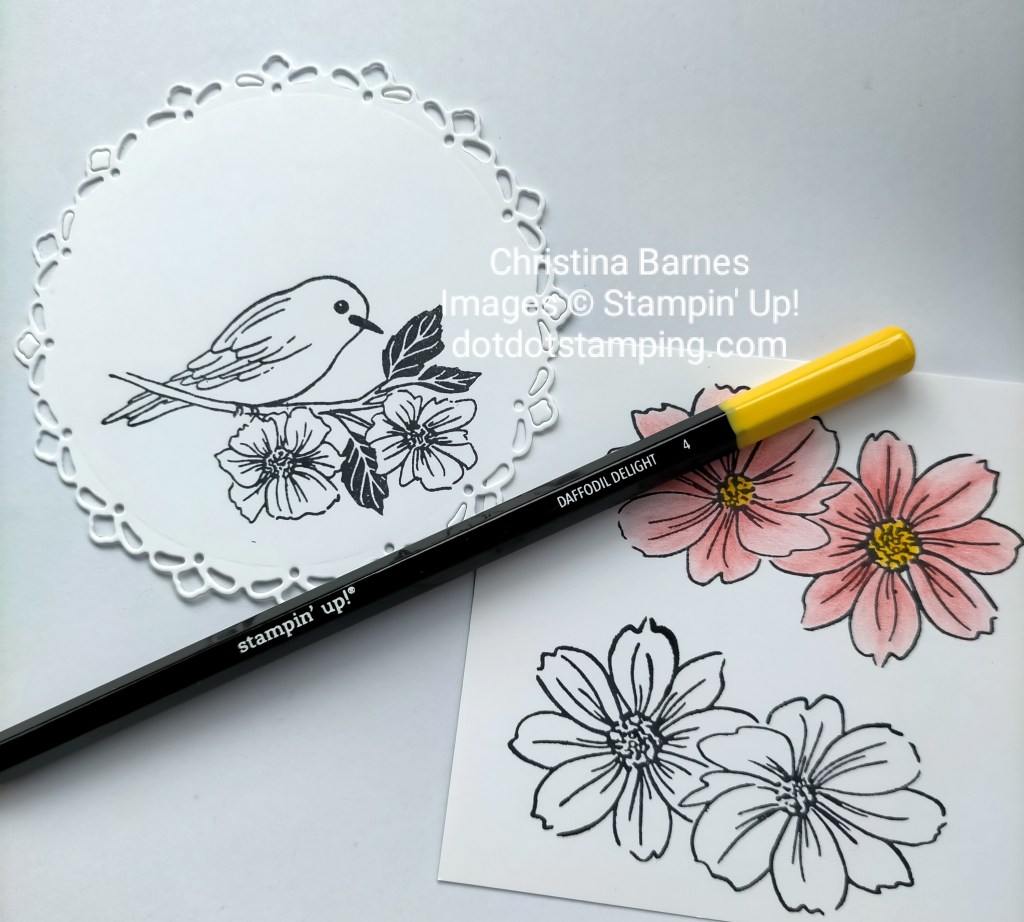
My card today uses the Stampin’ Up! Friendly Hello stamp set, one that you may not have seen yet. It is a brand new one, available from the 4th January 2022, along with the pretty Friendly Hello Designer Series Paper.
I fell in love this with gorgeous little bird as soon as I saw it, and am so grateful that I am able to earn free goodies from Stampin’ Up! just for choosing to be a demonstrator and share what I love doing. And of course, it’s always fun to receive free things, and this is one that you can also receive for free during this coming January/February Sale-a-Bration.
Cute little birdie is coloured using the Stampin’ Up! Watercolour pencils, but with no water involved, just coloured with the pencils. Isn’t this just the most gorgeous image? I have also stamped on the inside of the card with a smaller image from the same set, also coloured with the pencils.
While this one is only available to demonstrators prior to the 4th January, if you really want it, you could join my Stampin’ Up! family of demonstrators, with all the benefits that go along with that. Of course there are always the items that are on the Last Chance List and in the Clearance Rack to craft with until January, and I will be posting up some projects using those soon. Happy stamping! Chris
As I always do on a Saturday during the spring and summer, I spent my day at the lake watching my son sail.
But there’s plenty of time while rigging and de-rigging and all the rest, for me to need something to do. So today I stamped some images from one of the stamp sets from the upcoming Sale-a-Bration catalogue (just one of many perks of being a demonstrator, is early access to products before they are released to the public), and took my watercolour pencils for some relaxing colouring.
Maybe tomorrow I will show you one of the finished projects.
If you are in Australia and would like a catalogue, send me an email, I have the right here and can send one out to you. dotdotstamping@gmail.com
When I first started stamping in 2008, this was one of the first techniques I was taught . I’m sure there are other names for it but that’s what we called it, the Darth Vader (from Star Wars, for those that don’t know) Technique.
The reason this was one of the first techniques I was taught is because it uses Stampin’ Write markers to ink the stamp, and at the time, you could buy these markers individually, making it a cheaper way to get more colours in my stash.
Both the stamps were inked with markers on this card. So why is it called the Darth Vader Technique? Once the ink is on the stamp, it’s important to “huff” onto the stamp, the humidity from your breath keeps the ink damp enough to create a nice clear image.
I did a video of making this card on my Facebook page this morning – you can find a link to the page on the sidebar, so please drop in and say hi and leave a comment.
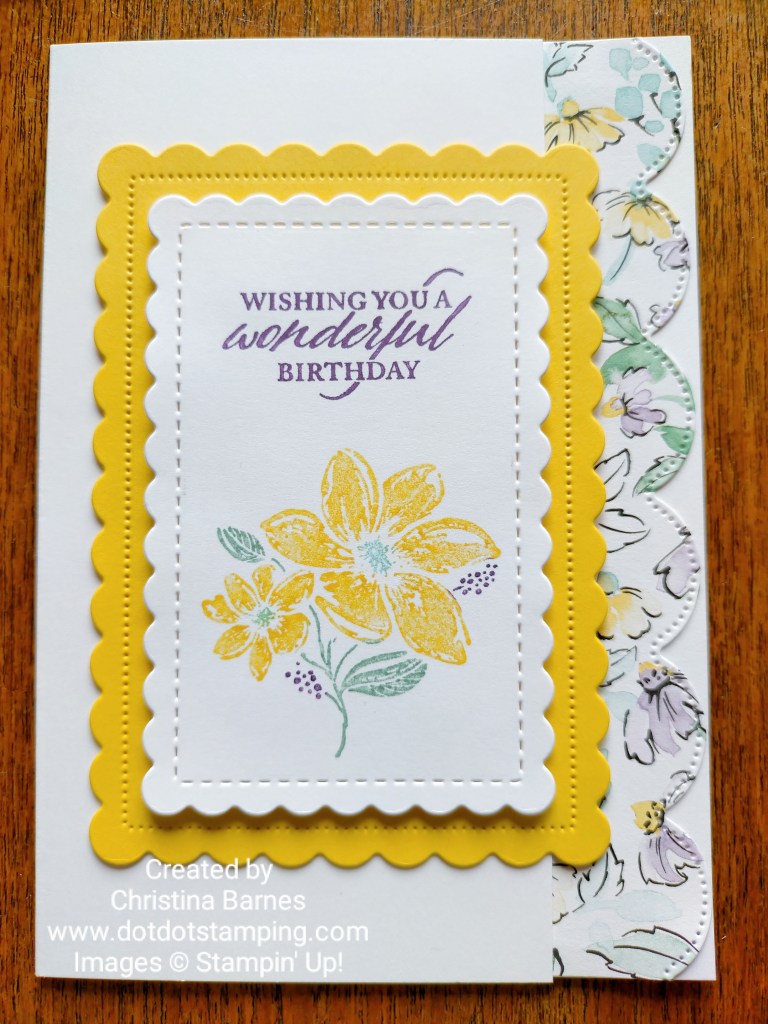
The card used the Elegantly Said stamp set, Scalloped Contours Dies and the Hand-Penned Designer Series Papers.
Happy New Year to each and every one of you. I have, once again, been very quiet on the crafting and blogging front, but with so many gorgeous new Stampin’ Up! goodies, I couldn’t resist having a play today.
And since we are about to have a heat wave in this part of Australia, it may well be a good time to stay inside, in the cool, and do some stamping and creating.
One of the things I decided I would like to share with you this year, is that you don’t need a lot of products to make gorgeous cards. Many of us have financial challenges right now, and it’s always good to find ways to make the most of what we already have.
And I also want to show how to take a simple card, and to dress it up in various ways.
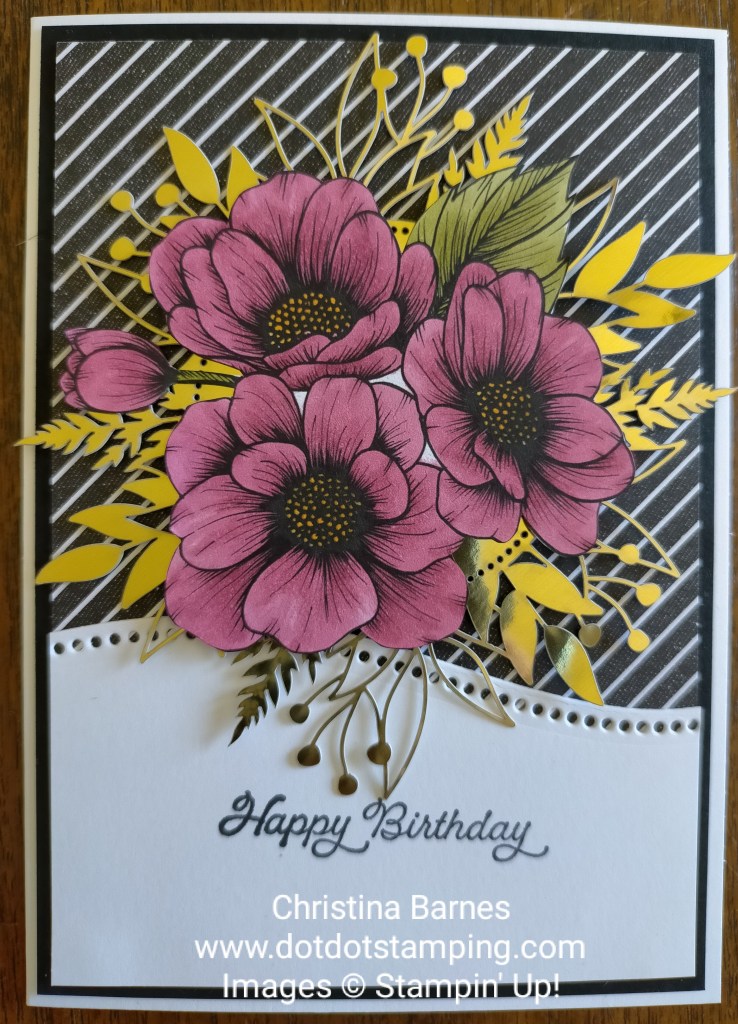
So, my first card for 2021 uses the gorgeous new Designer Series Paper called True Love DSP, I can see myself using this a lot. This was at the top of my list from all of the beautiful new things in the January – June Mini Catalogue.
I started out with just a black and white card – elegant and quite easy to make, and all you need is the True Love Designer Series Paper, some white and some black cardstock.
The flowers have been cut from the Designer Series Paper using paper snips.
So then to make it different, I coloured the flowers using Stampin’ Blends in Rococo Rose colour, with Old Olive for the leaf.
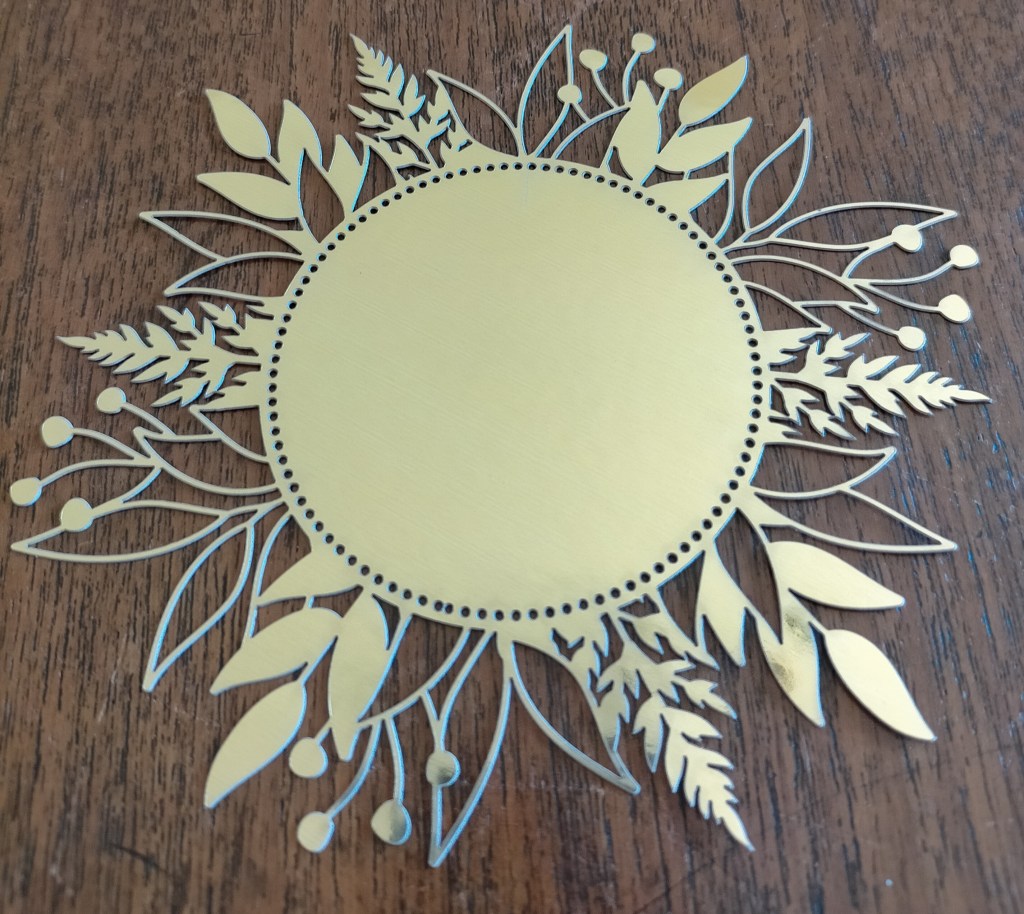
It’s lovely just like that, but I have some of the Forever Gold Laser Cut accents that were calling out to be used, so I have added one behind the flowers.
The gold accent adds some lovely depth and texture to the card.
I felt it needed a little more Old Olive, and had some spare leaves from another project, which I have added in, and I am happy with the end result. I’m sure there is more that could be added but I like as it is.
It looks like a gorgeous, cheerful bunch of flowers to brighten your day!
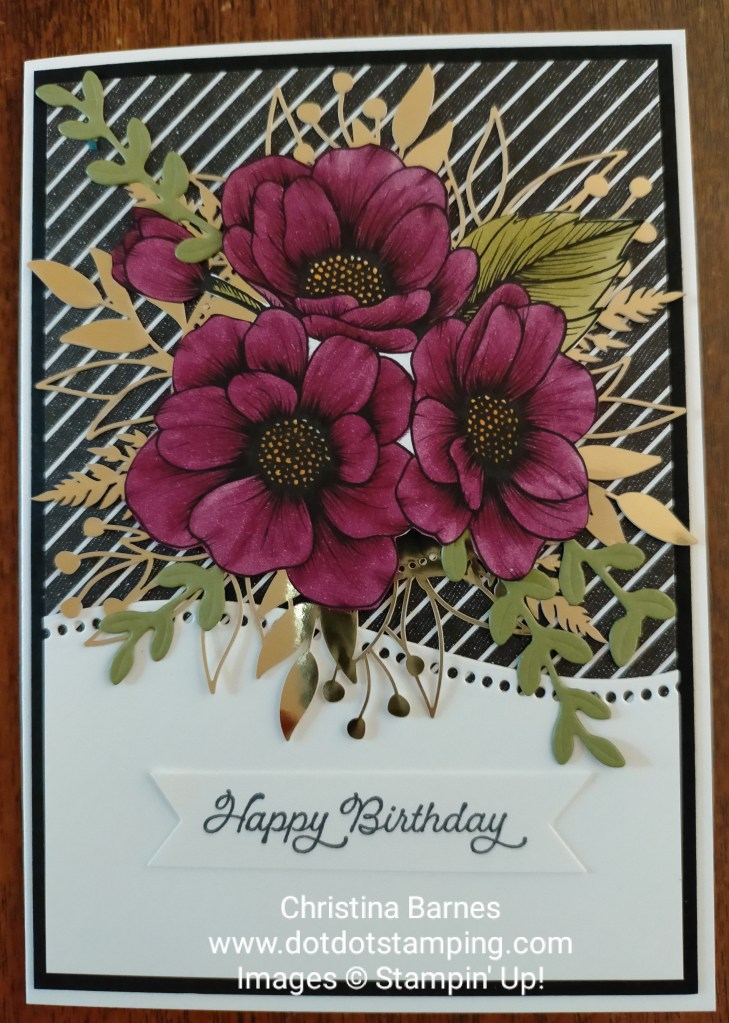
Here is the same card with the flowers coloured in Rich Razzleberry.
The words come from the Posted For You stamp set (but you could use anything that you already have), and the lovely curved edge is the Curvy Dies.
I hope the weather is not too extreme wherever you are in the world. And I hope you are able to get in some crafting time, just for yourself.


")
 Specialty Designer Series Paper")


")
 Specialty Designer Series Paper")
 Specialty Paper")