This morning’s Facebook Live is now available to watch both on Facebook and YouTube.
As you can see, the Cottage Wreaths stamp set and matching dies are great for cards of all occasions, as well as Christmas. I hope you enjoy watching the video, although I have to apologise for being quite distracted towards the end, one of my cats could hear me talking but couldn’t work out where I was and was getting quite vocal. Cheeky little rascal.
The kits to make the three cards are available for free to anyone who places a $30 order in my online store before midnight this coming Sunday 30th July (shipping extra). The kits will be sent out separately to your order. And just a reminder that due to Stampin’ Up! policy, I am unable to stamp images to include in the kits – that means you get to do the fun stuff! Don’t have the Cottage Wreaths stamp set? Try the cards with a different stamp set, that’s part of making creativity fun. Alternatively, you can order the stamp set and dies by clicking on the images below. Happy stamping, Chris
You may have seen my blog post from yesterday where I mentioned having taken part in a Stampin’ Up! Demonstrator only event, where we made projects using the Translucent Florals Bundle (currently only available to demonstrators who took part in the event). Today I am sharing the second project we were given to make. I didn’t put together the first card in this series, preferring the stepped up version, and even then I made my own adjustments.
A mask was made using some of the leaf dies from bundle, and this was used to add texture paste to the card base. However, before applying the texture paste, I lightly sponged some Gray Granite ink directly to the cardbase, and using the same coloured Stampin’ Write marker, outlined the edge of the sponged leaves and added some veins. The sentiment is stamped in Copper Clay, with a tiny strip of Copper Clay cardstock along the bottom edge of the sentiment. And because I really liked the Copper Clay with these colours, I have added some of the In Color Dots. And here is my alternative idea for this project.
For this card I have added a white layer (cut with the Deckled Rectangle Dies) over the Gray Granite cardbase, which gives it a brighter look, and had an odd shaped scrap of Garden Green cardstock which I have cut down and added behind the white to the top corner. Again, I have sponged some leaves, this time in Garden Green ink, before adding the green die cut leaves over the top.
As you can see, we had a lot of fun at our Creativity Now Demonstrator event. You can take part in these events too, there is a wonderful opportunity this month to join at a great price with a lot of extras, so all you need to do is to take the plunge and make the most of that opportunity. You won’t regret it. Reach out to me if you would like to chat more about it. (Australian residents only, please).
I have no idea what the name of the technique is, but it was a lot of fun!
My card features the Elegant Eucalyptus Embossing Folder and I’m enjoying playing with the returning colour Berry Burst, which is just soooo yummy!
Here’s the inside of my card…
And below are some other embossed panels that haven’t been used yet but you can see how the technique shows up. Check out Lisa’s vid, it’s a lot of fun playing with this technique.
These Masks make it so easy to create gorgeous cards and are a lot of fun to use as well.
I made this card during my Wednesday morning Facebook Live this week, using the Stamparatus to anchor the cardstock and mask in place while I was sponging the colour onto the background. The Butterfly is sponged and then fussy cut. You can see how I made this card Live here. I also mentioned during my Live that I will no longer be doing two Lives per week on Facebook, but will only be doing the Wed morning one. So make sure you Like my Facebook page, I love to have some more interaction there . Do you have a favourite item from the new Mini Catalogue? Pretty difficult to choose just one, but these Masks are up there amongst my favourites.
January 2022 Host Code: BTZ4CRW Use this host code when you order online, and if your order is $50 or greater you will receive a free gift from me! If your order is $250 or over, please do not use this code, but you’ll still get a free gift. The free gift will be your choice of any item valued up to 10% of the value of your order, from the 2021-22 Annual Catalogue or January – June 2022 Mini Catalogue! That includes some of the Host Exclusive items, PLUS you get your choice of Sale-a-Bration items as well.
My Happy Rainbow Card! We have had some very hot summer days here in my part of Australia, but storms came over last night and today is heavy, humid and very dreary. At least it’s not cold though. And I woke this morning wanting to create something bright and colourful but since I have a lot happening today, it needed to also be quick to make. So here it is, my Happy Rainbow Card.
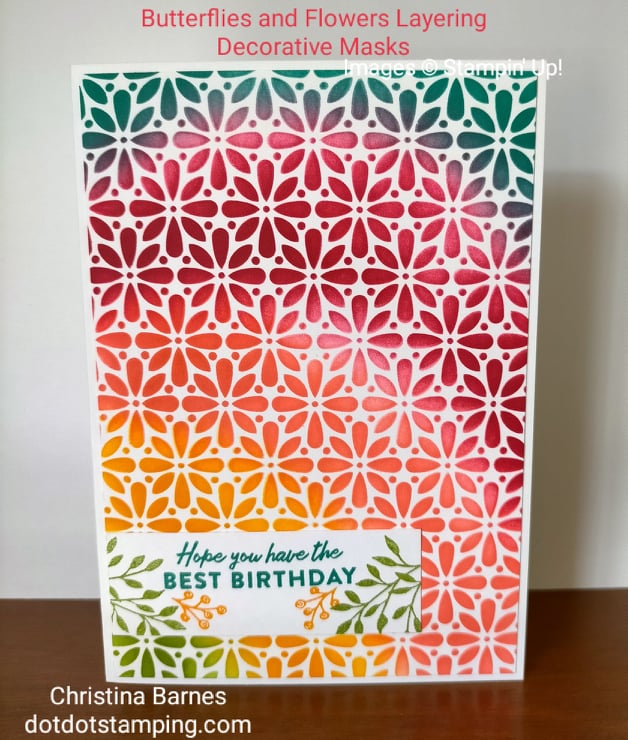
My card features the new (available tomorrow!!) Butterflies and Flowers Layering Decorative Masks (that’s a bit of a mouthful) which are sensational and I absolutely love and am enjoying using in heaps of ways. I seem to be saying that about a lot of things from the new catalogue! For this card, I have simply placed the daisy mask over a piece of Thick Basic White cardstock (you could use standard white but I find the thick is easier to manage for this), worked out my colour order, grabbed my blending brushes and blended the inks from bottom left to top. 5 minutes from start to finish is not an exaggeration, and it’s so pretty and cheerful. The colours are inspired by the new Sale-a-Bration FREE Designer Series Paper (which I don’t have yet) called Sunshine and Rainbows – Granny Apple Green, Mango Melody, Flirty Flamingo, Melon Mambo and Bermuda Bay.
I will be doing a Facebook Live on Wed morning – 5th January at 10.30am (EADT Sydney Time) and using these masks to create a card, so please join me. Make sure to Like my page while you are there so that you get notifications of my posts and events.
The Masks will be available from my online store from midnight tonight! With shipping delays around the world, there are some products that are not going to be available immediately. This is changing daily as items come in, however can I please ask that you understand this is out of my control and also out of the control of Stampin’ Up!, this is a global issue which is effecting the movement of products of all sorts, so there is absolutely nothing we can do to change the situation, other than to enjoy the things we can get, eg these gorgeous masks!
Use this host code when you order, and if you order $50 or greater you will receive a free gift from me! If your order is $250 or over, please do not use this code, you’ll still get a free gift – your choice of any item valued up to 10% or your order (excluding shipping costs) from the 2021-22 Annual Catalogue or July-December 2021 Mini Catalogue! That includes some of the Host Exclusive items. (Australian orders only please).
***Make sure that you can see my name on the final checkout page listed as your Demonstrator when you order so that you know that you’re ordering with me and you’ll get my rewards!
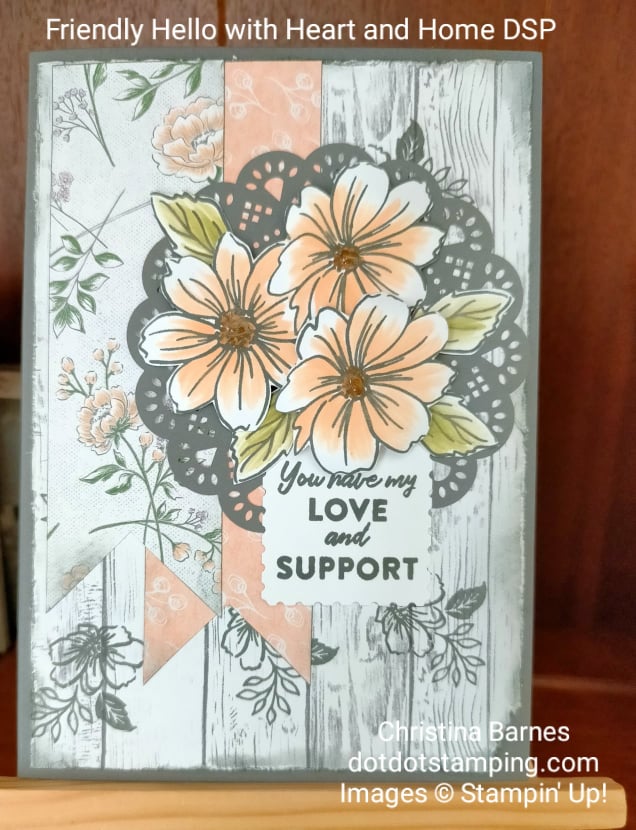
As I am sure you can tell, I just love the Friendly Hello Sale-a-Bration stamp set (available 4th January 2022), I am also loving the Heart and Home Suite (also available 4th January from the new Mini Catalogue) – yes, there is a lot to look forward to with all the gorgeous new goodies coming soon.
I made this card during my regular Wednesday morning Facebook Live, I have to admit though, I was very tired and probably sounded it. However I think the card turned out ok. This is a style I love to make, I know it’s not everyone’s cup of tea but it is easy enough to adjust it to be less “fussy” and appeal to a wider range of people. The gorgeous flowers from the Friendly Hello set, have been stamped in Basic Gray and then coloured with Pale Papaya ink and Blender Pens. And that gorgeous Basic Gray doily is part of the Heart and Home suite. Did you know that you can watch most of my Facebook Lives on my YouTube channel? Make sure you hit the subscribe button to get regular updates. Click here to go straight to my youTube Channel. I’m not sure about you, but I am looking forward to some holiday time and some down time to connect with some creativity and have a play with some new products and ideas. Happy stamping! Chris
My card today features the flower outline stamp from the Stampin’ Up! Color and Contour Stamp Set. The card is quite simple and a great way to introduce beginner stampers to the joy of easy stamping. The white centre panel has been sponged using the Blending Brushes, using Polished Pink, Calypso Coral and Daffodil Delight. You can see the live demonstration of me making this card here. And don’t forget you can place your order for any of your Stampin’ Up! necessities any time on my online store.
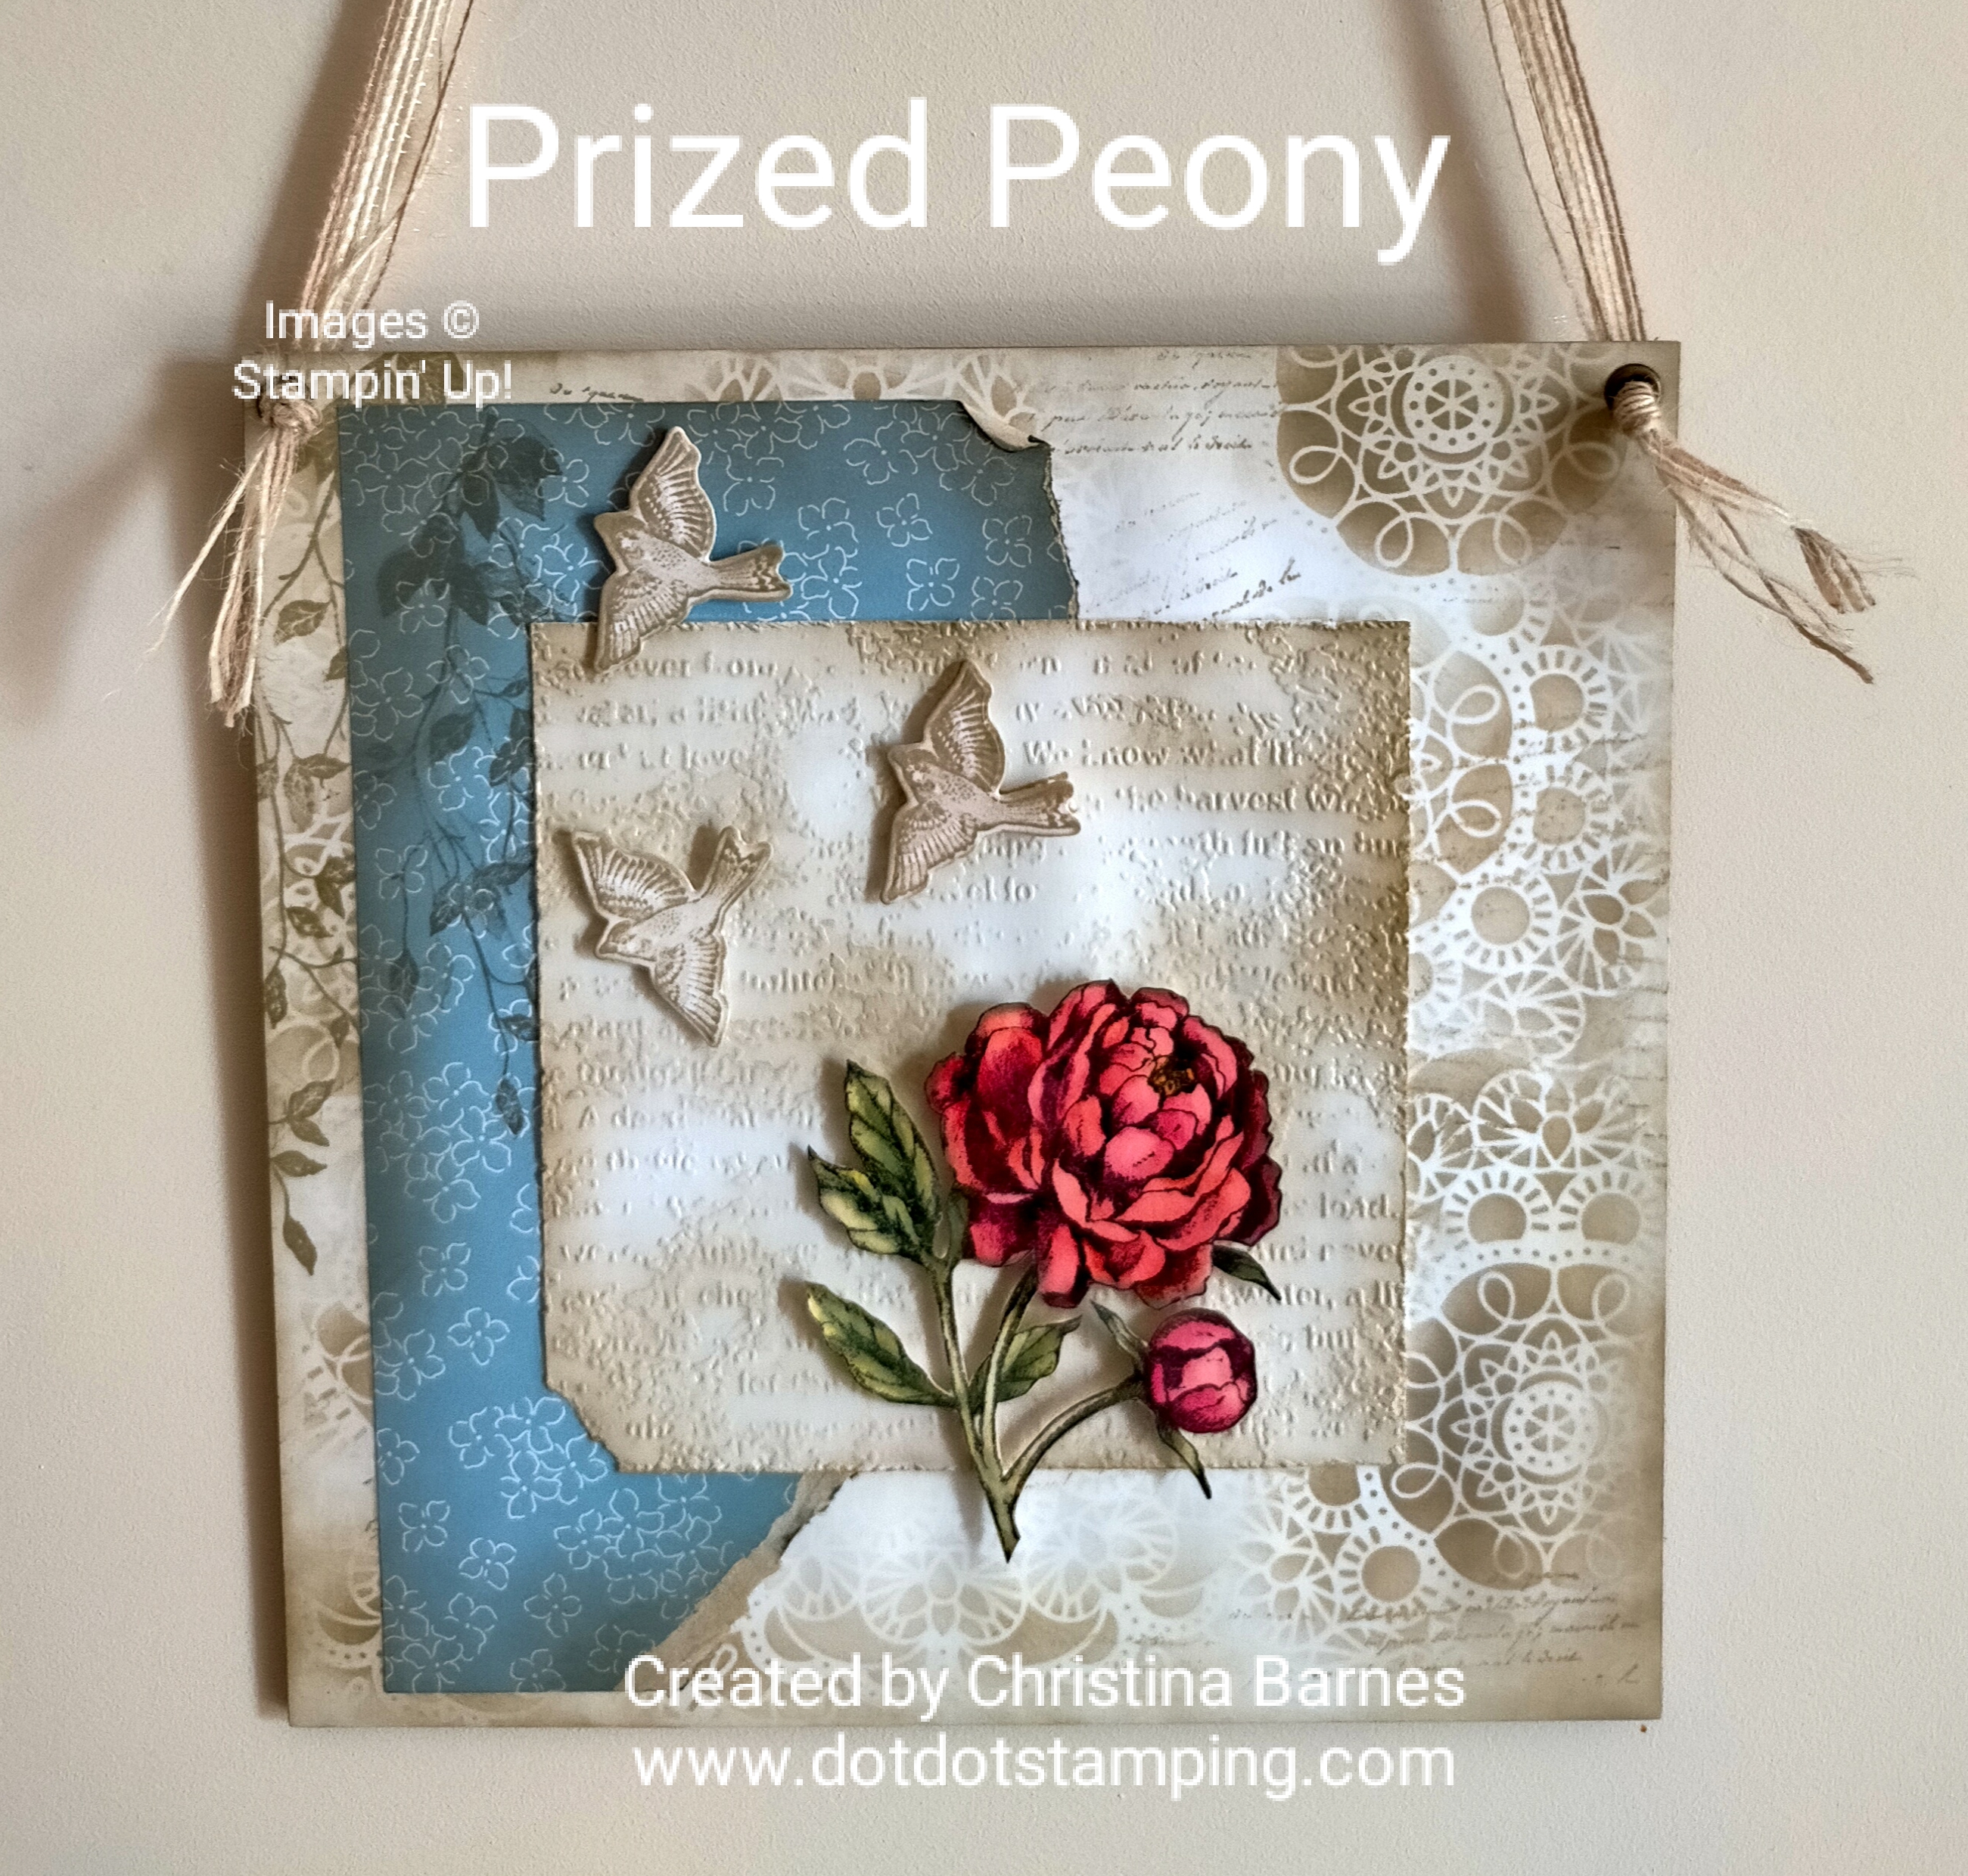
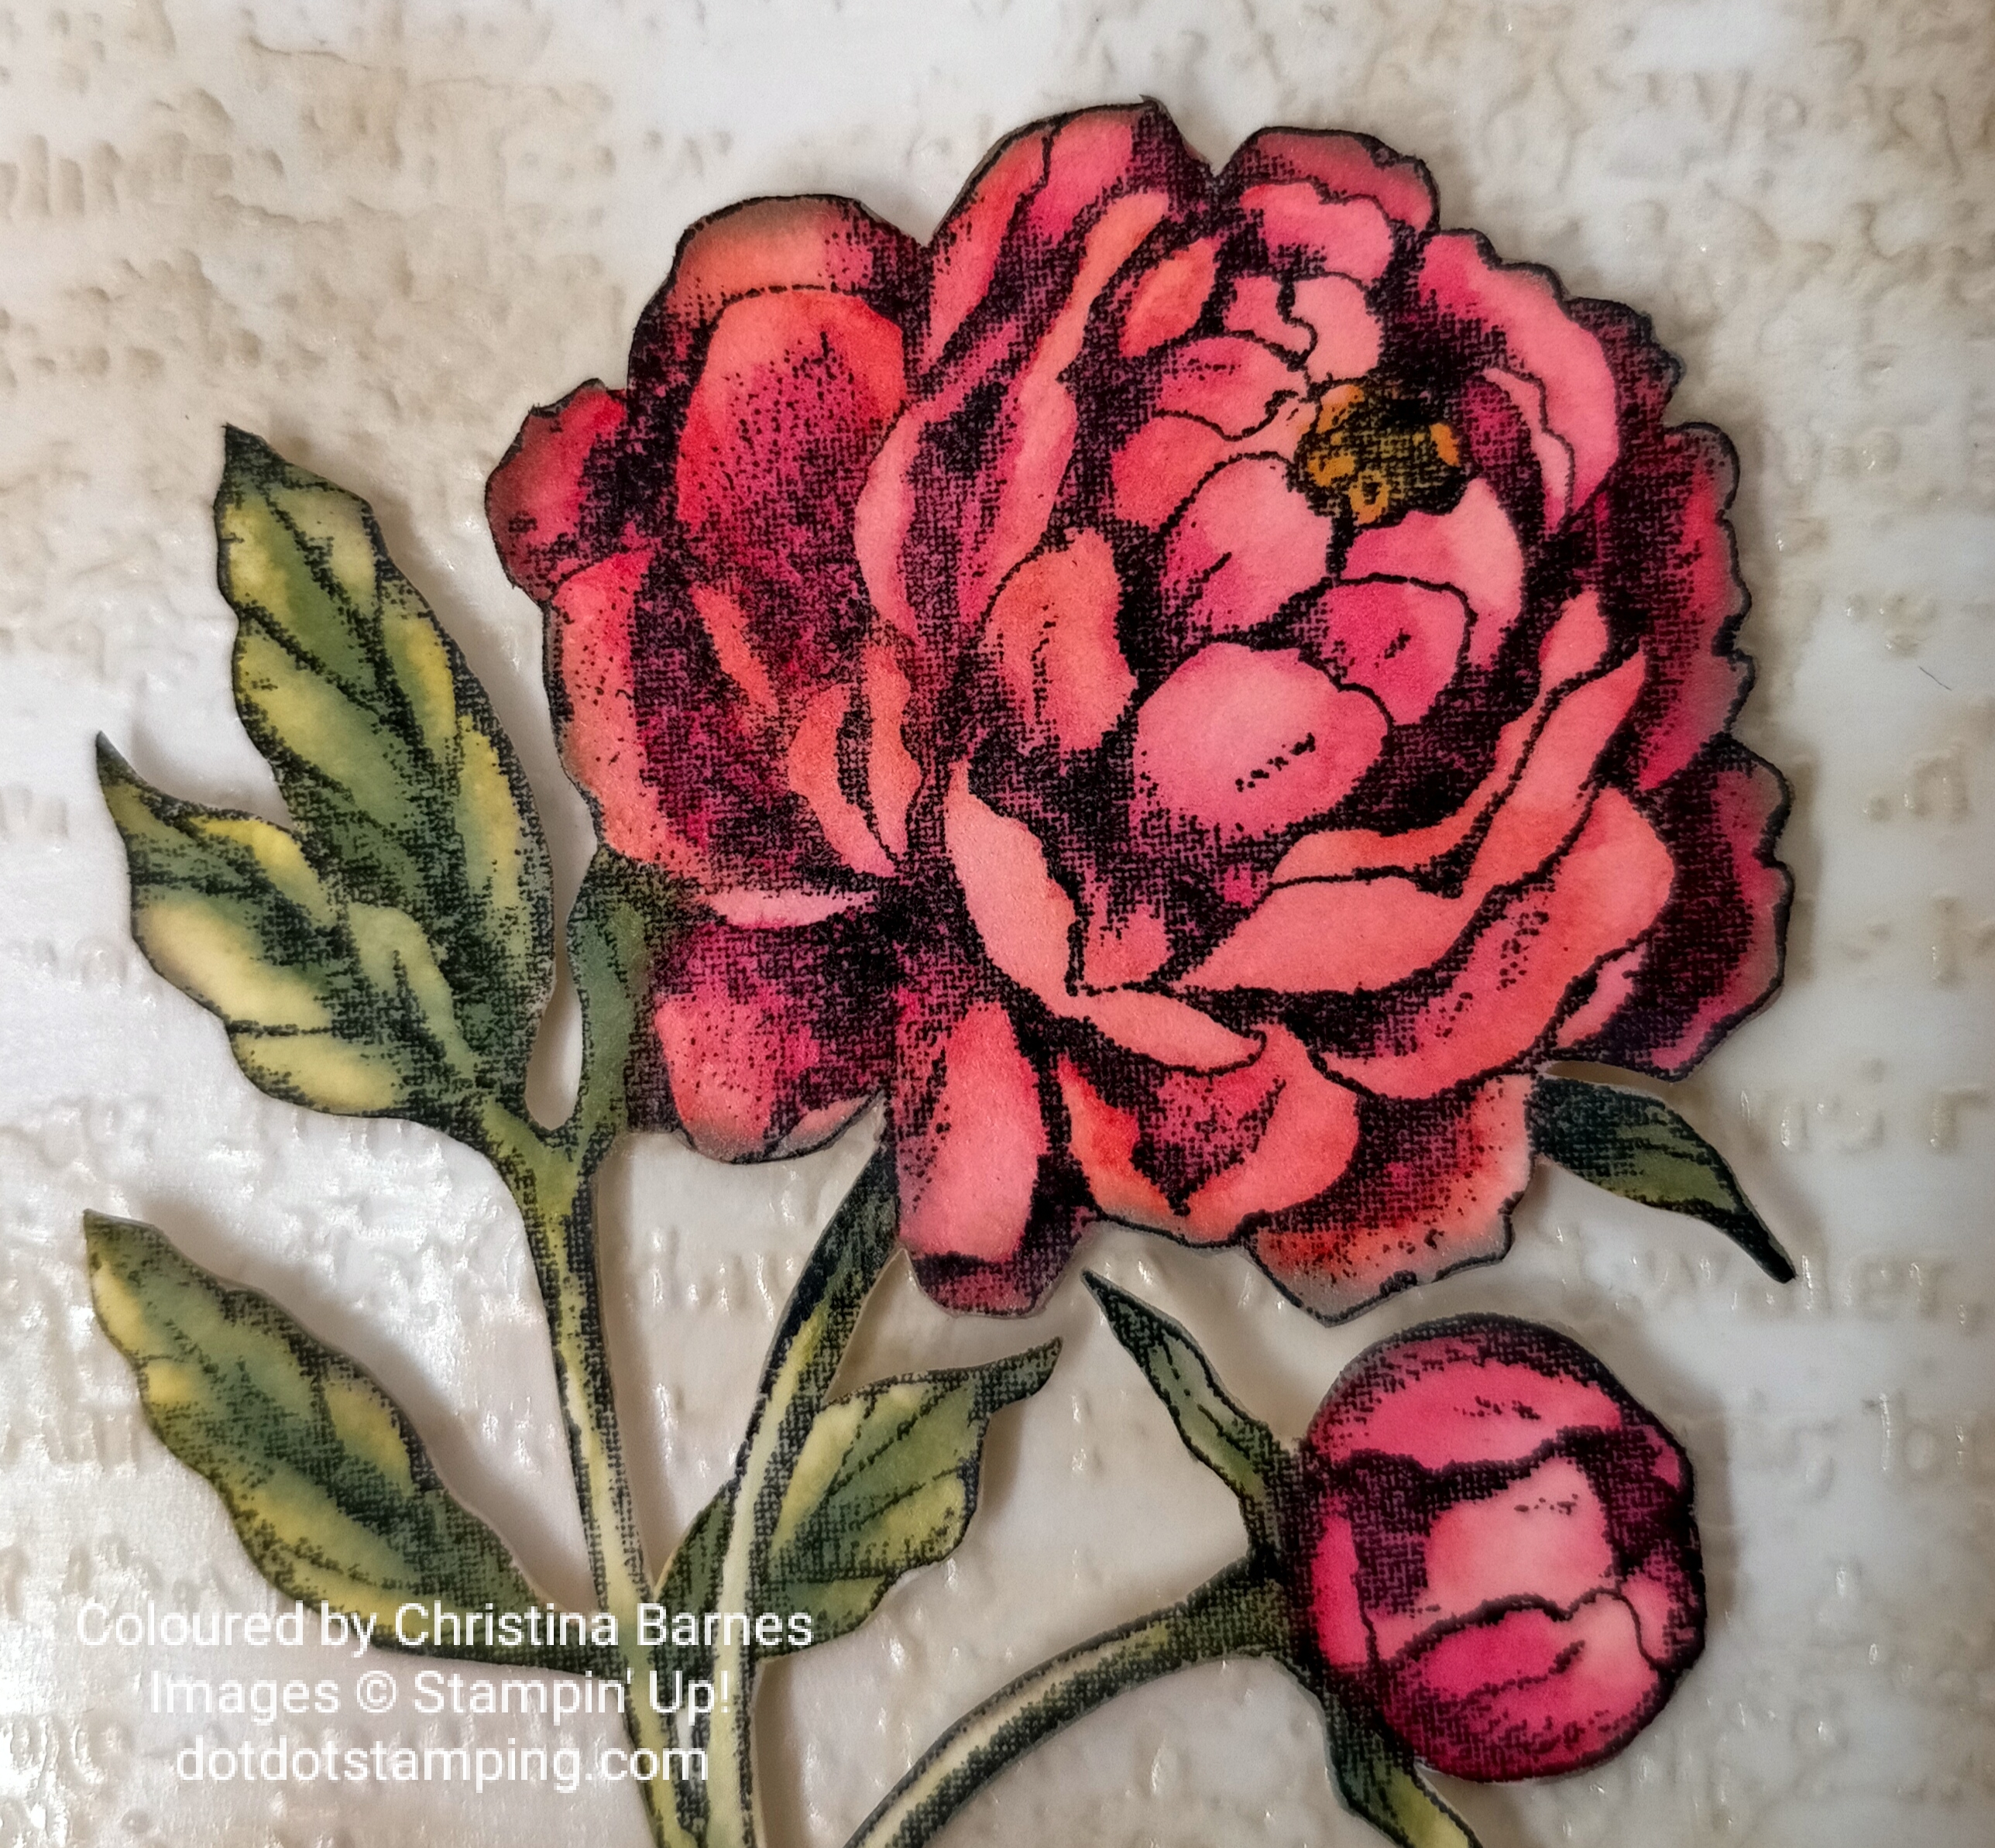
I spent most of my morning creating this piece, which I’m not quite sure what to call. It’s not really mixed media because it’s all the same techniques we would use on cards. I have made it for a local art gallery which is having an exhibition where everything that is displayed must be 8 x 8 inches. So I started with a piece of very heavy card, the type that sometimes comes in with the Specialty Designer Series Papers, which I cut to 8 x 8 inches, and also cut one of my pieces of Basic White cardstock the same size (the very same Basic White that I am trying not to use too much of right now!!). I have sponged the edges with Crumb Cake ink, and then a heap of sponging with daubers over a decorative mask which was actually the front of a retired laser-cut card. So heaps of sponging and stamping, and then watercolouring the Prize Peony. For that I have used Stazon Black ink onto Watercolour Paper, then coloured with ink and the Water Painter. The ink colours are Old Olive, Daffodil Delight, Calypso Coral and Polished Pink.
I have also used some retired Designer Series Paper and ribbon, the Timeworn Type Embossing Folder, Very Versaille Stamp Set and Beauty of Tomorrow Stamp Set and matching Dies.
Just a quick post today to share one of the cards we will be making at my upcoming Big Shot Basics class on the 6th. 7th or 8th of July.
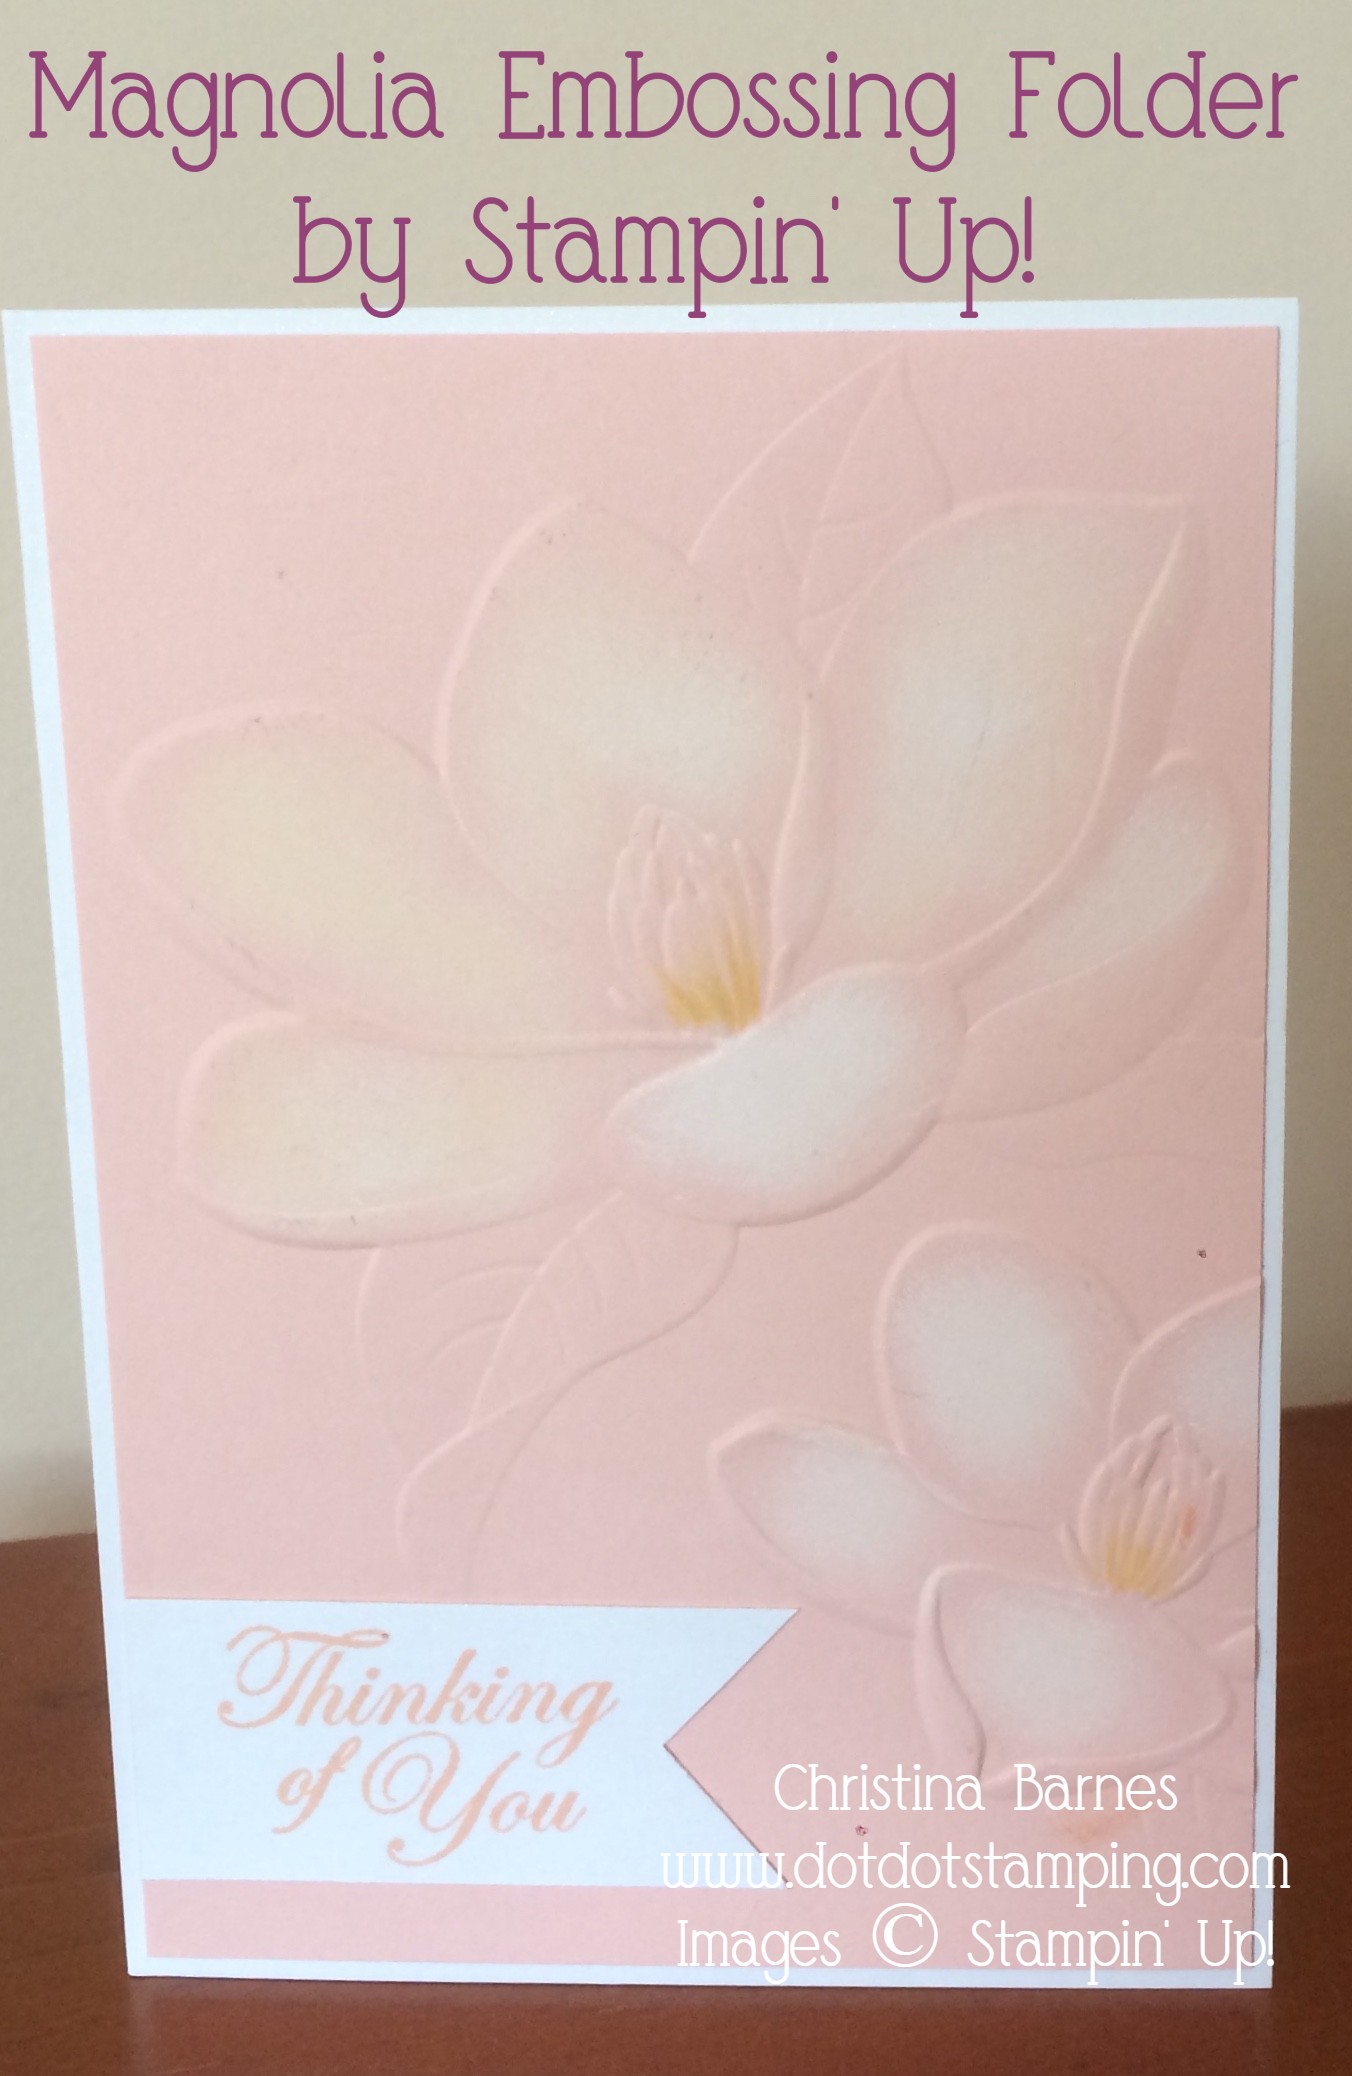
Such a beautiful embossing folder, it is just so elegant, and works for any occasion.
I will be sharing some other ideas for this one at the class and also here in a couple of weeks.
The Petal Pink layer of this card has been run through the Big Shot with the Magnolia Embossing Folder, and then sponged with Whisper White craft ink to give the white areas of the petals. The centres of the flowers have been coloured with Blender pens and So Saffron ink.
I have used one of Stampin’ Up!s Decorative Masks to create the background for my card today. These are such a simple but effective tool which would also be fantastic for using on scrapbook pages, art journal pages, and a heap of other things.
Something else I will be experimenting with, they are so easy to use, and it makes it super easy to create a quick background.
So I have gone with some yummy Grapefruit Grove cardstock for my main colour, and sponged….. Flirty Flamingo ink through the Decorative Mask.
Yes you read that right. You could, of course, use Grapefruit Grove ink and that would work too, but right now I don’t have Grapefruit Grove ink 🙂 and I liked the depth that the Flirty Flamingo ink added over the base colour.
Add some strips of off cuts and left over pieces of patterned paper and cardstock, and some white Baker’s Twine, and that’s a really quick and easy card.
The ends of both white off cuts have been punched using the Classic Label Punch, (another super versatile piece of equipment!) and the words are from Butterfly Gala stamp set.
Inspiration for my card came from the current Sketch Challenge at Just Add Ink.
If you’ve been following me for a while, you will know that I LOVE a sketch challenge 🙂


")
 Designer Series Paper")
 Designer Series Paper")


")

")