Stampin’ Up! Abundant Beauty Decorative Masks

You may have noticed that I love, love, love decorative masks, stencils and sponging, I love the look and the amount of different ways they can be used to create and decorate.
I also love colouring. So my card today is a mixture of both of these.
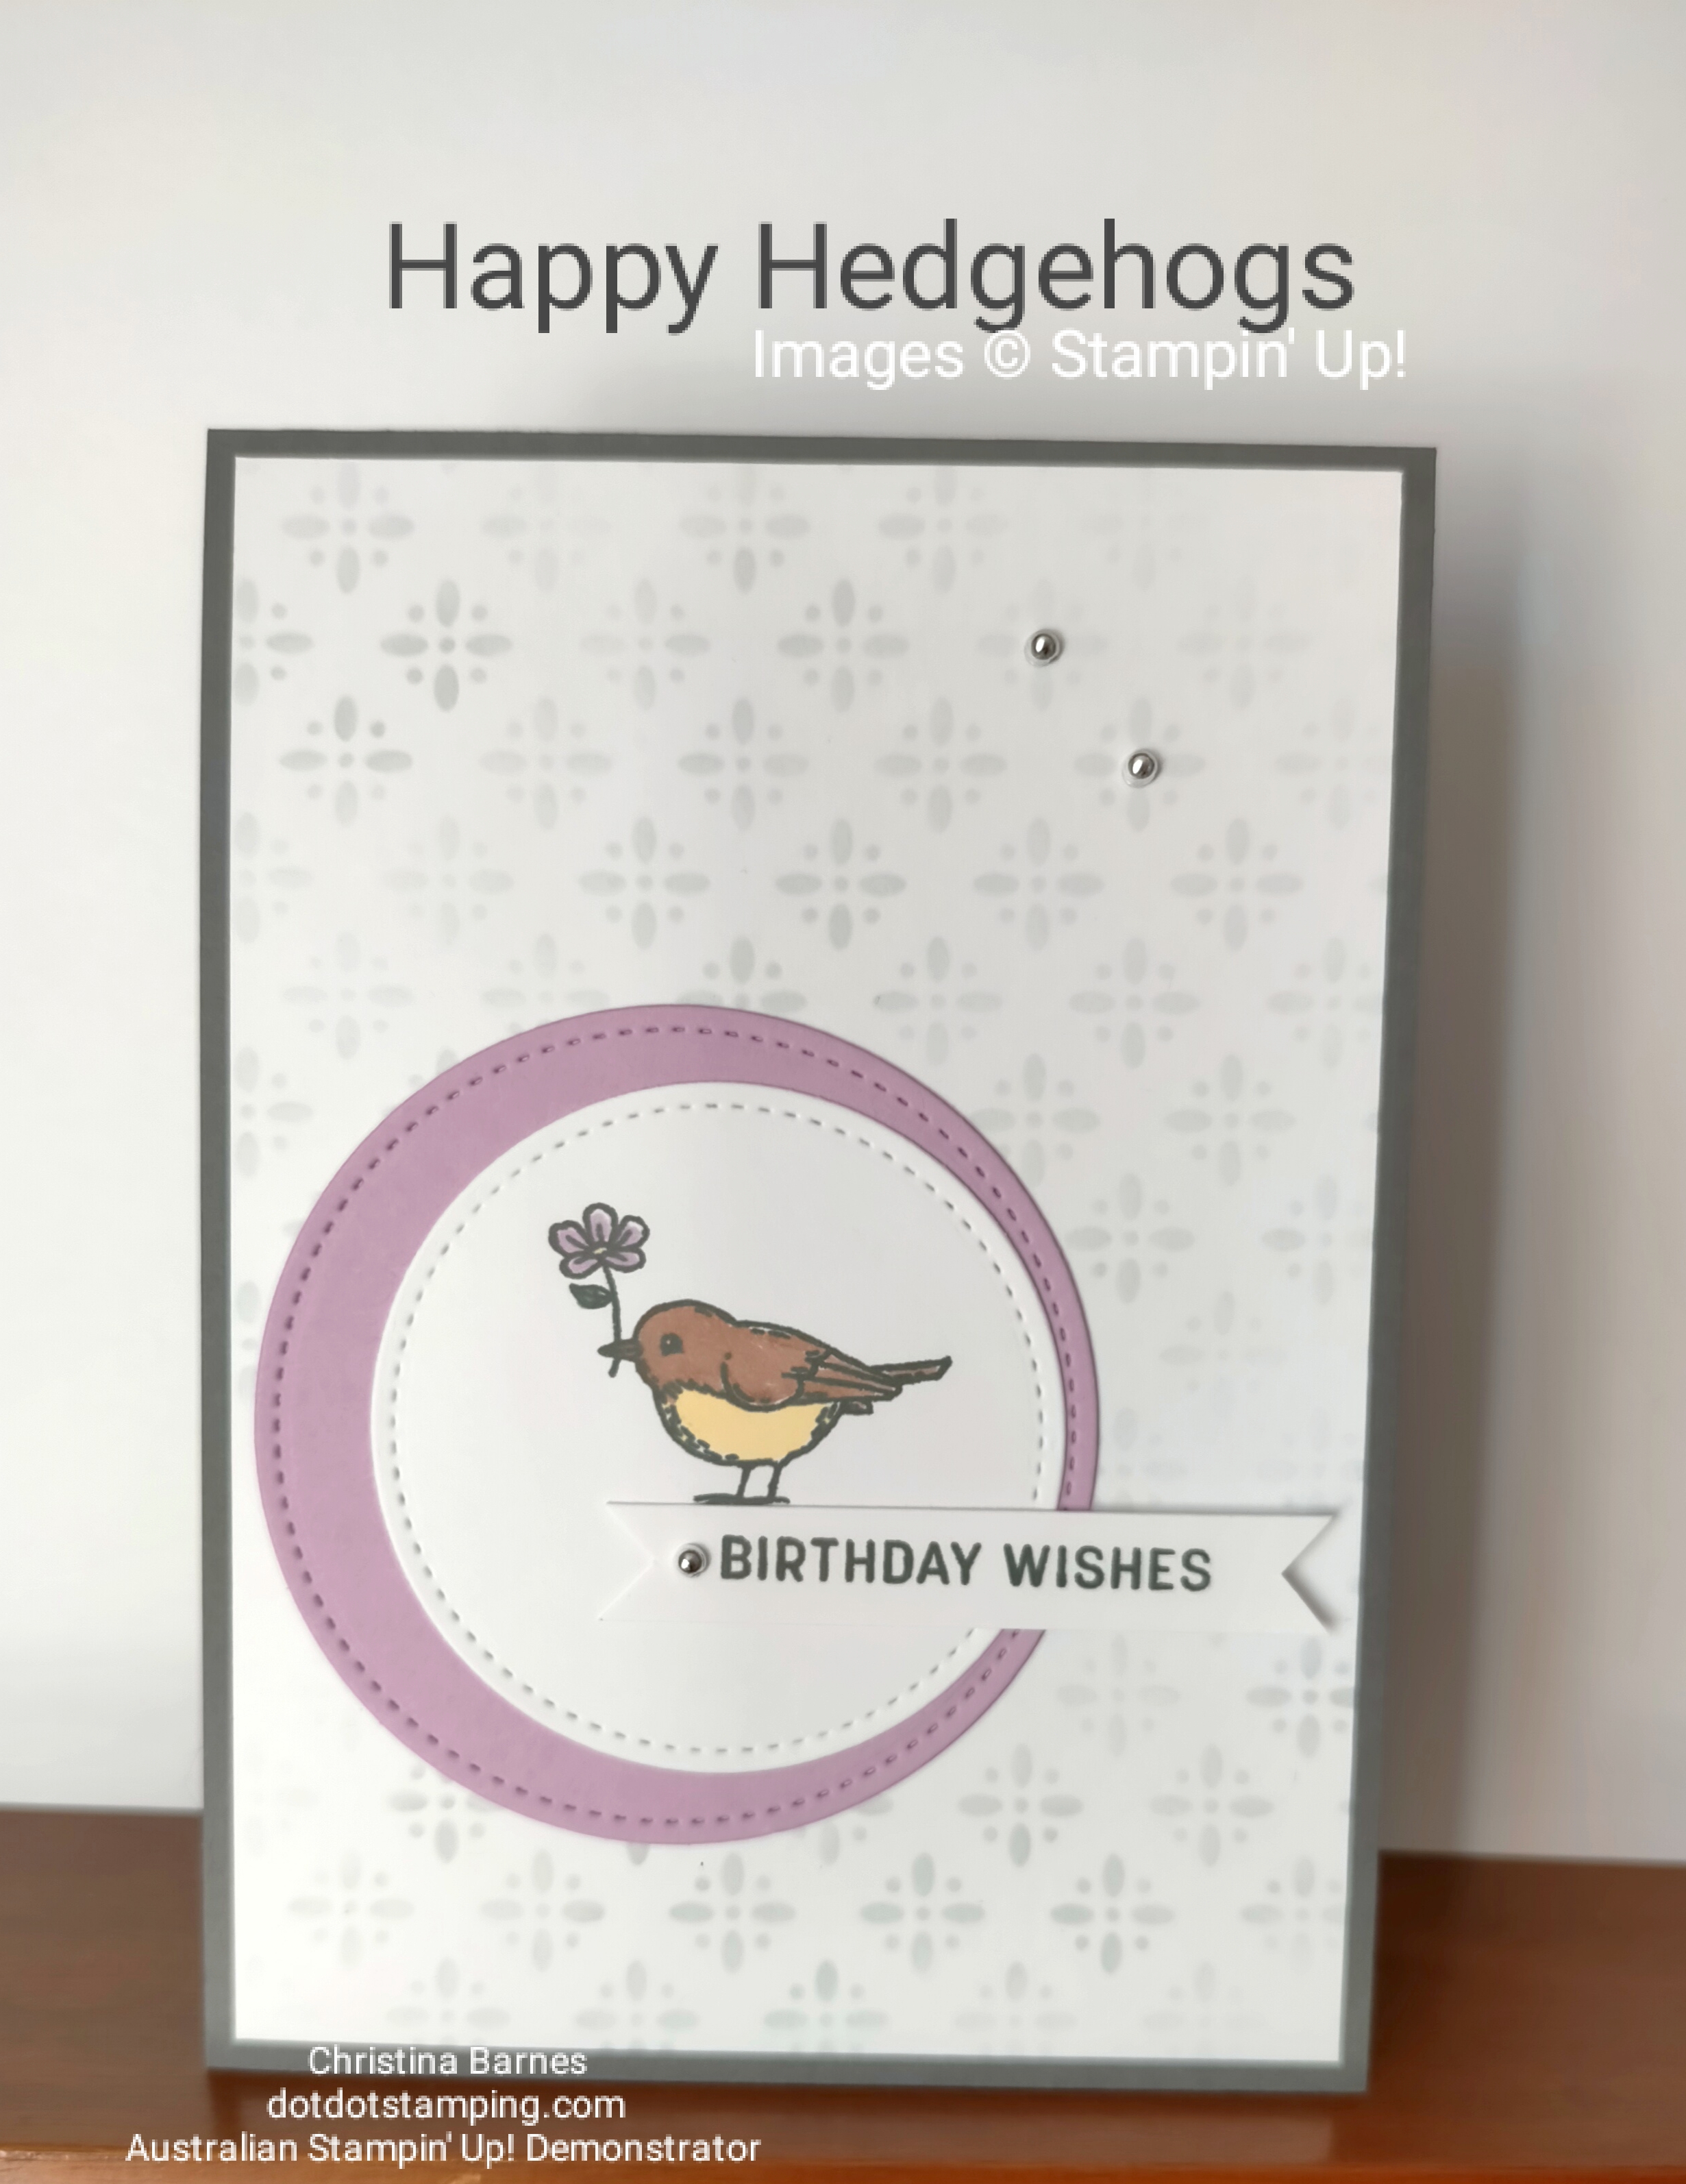
Cute little birdie, along with the branch and leaves from the Bird’s Eye View stamp set has been coloured with Watercolour Pencils before I used Wink of Stella to blend the colours and add a bit of sparkle. They have all been fussy cut and glued to the front of my card.
And the strip of gorgeous Afternoon Azure colour down the left hand side has been masked off with Masking Paper and sponged with Blending Brushes before I added one of the Abundant Beauty Decorative Masks over the top, and sponged a little more, for some tone on tone colour to brighten the card up.

Below is the video of how I made the card.

The gorgeous Abundant Beauty Decorative Masks are new and now available in the Mini Catalogue, along with a stack of other new goodies, including Christmas products.

Make sure you head on over the The Crafty Addicts site to check out what the Design Team have created for this month.

Happy stamping,
Chris

Product List
Bird’s Eye View Photopolymer Stamp Set
$35.00
Watercolor Pencils Assortment 1
$28.00
Watercolor Pencils Assortment 2
$21.75
Clear Wink Of Stella Glitter Brush
$14.00
Blending Brushes
$23.00

Links by TheseAreMyStamps.com


Colour Creations Stampin’ Up! Basic Gray

This week’s Colour Creations featured colour is Basic Gray, a colour I often overlook but which is such a versatile colour. And I love it with Fresh Freesia, which I have used for my cards today.

My first card is very simple, with the tree image from Happy Hedgehogs stamp set, stamped in Basic Gray and the butterfly in Fresh Freesia.

I’ve then stepped the card up by colouring the tree with Stampin’ Blends. Yes, you can colour with Stampin’ Blends when the outline image is stamped with a waterbased ink, as long as you don’t blend the outline ink. I don’t use the brush end of the Stampin’ Blends for this, and keep the colouring very simple.

I have used Stampin’ Blends in Fresh Freesia, Daffodil Delight (for the flower centres) and Shaded Spruce. I’ve also added a strip of Masterfully Made Designer Series Paper in Fresh Freesia behind the main panel, and added some silver dots for some bling.

My second card also features the Happy Hedgehogs stamp set, this time the cute little birdie.

The card base is Basic Gray again for this card, and for the background, I have used one of the Artistic Mix Decorative Masks and a Blending Brush and Basic Gray ink, very lightly brushed on to create a subtle background.
The bird is stamped in Basic Gray and coloured in the same way as the second card. The circles were Die cut using the unfortunately retired Stitched Shapes Dies.

We made these cards today in my monthly Card Class, which was a lot of fun.

Next along in our Blog Hop is the talented Tina Gillespie.

If at any time you find a broken link, please go to the blog of our Colour Creations host, Catherine Proctor, who will have a list of all of the participants in the Blog Hop.

Thanks for stopping by.
Happy stamping, and happy hopping,
Chris

If you live in Australia and would like to purchase the items used to make my card today, you can click on the indiviual items listed below to go straight to my online store, or click here.
Alternatively, you can use your device to scan the QR code below. And don’t forget the fantastic July Promotion, spend $90 (before shipping) and receive a voucher to spend next month. I always love this promo, it’s the best!!

Product List

Links by TheseAreMyStamps.com

Colour Creations Stampin’Up! Azure Afternoon

This week’s Colour Creations Blog Hop features the gorgeous blue, Azure Afternoon. It reminds of the sky on a clear day here in my beautiful part of Australia. I will share a photo later and you will see what I mean. But first to my card.

I have kept my card quite simple, using the Foursquare Decorative Masks and Blending Brushes to create a background, and then stamping and punching out the boat, which is the Let’s Set Sail stamp set, and matching Sailboat Builder punch. And I’ve used some Starry Sky ink for the boat and sentiment and cardstock for the frame for my boat.

I made this card for my wonderful 17 year old son, he has had so much going on over the last few months, some amazing things, and some disappointments as well. So I really wanted to give him a few words of encouragement to keep believing in himself and in his dreams.

I’ve been wanting to get back into some Scrapbooking / Smashbooking / Scrap Journalling for some time now, and when I was tidying and reorganising my craft space recently, I came across one of the 6 x 8 Albums which are on Page 135 of the Annual Catalogue, and I decided it was time to use it and create some pages to fill it. So here is the first one, based around the card above.

The only addition I have made, is to use some of the Let’s Go Fishing DSP and some Linen Thread. The opposite page will have the journalling.
You may have noticed there is something missing from the page. I went to get the photo developed that I wanted to use for this, plus some other’s for the next couple that I am planning, only to find that the only place that used to develop photos in my town, no longer does it. So I will have to use an online service and get the photos sent to me. One of the down sides to living in regional areas.
However, the photo below shows the upside to living where we do.

This is a photo of my son sailing his boat on the lake near to where we live, and that sky is a beautiful Azure Afternoon colour. This is the photo that will eventually go on the page, once I get the photo developed.

Next along on our blog hop this evening is Kate Morgan.

If at any time you find a broken link, please go to the blog of this week’s host of the Colour Creations Blog Hop Catherine Proctor, who will have a list of all of the participants in the Blog Hop.

Happy Stamping
Chris

If you would like to browse my online store click here, or alternatively, if you would like to use your device you can scan the QR Code below.

Product List

Links by TheseAreMyStamps.com

The Crafty Addicts Challenges – Colour Splash Card

The Crafty Addicts is back again this month with an open challenge, meaning we want to see any and all of your cards, there’s no restriction as to what you can use, just craft away and share with us.
My card for this month is one that was a bit of an experiment, I’m not too sure that I am happy with the colours, they are for a colour challenge, and I’m not sure I would normally put them together. But it’s always fun to play with colour.

I have used the Foursquare Decorative Masks and some Masking Paper. Each section has been masked, then coloured with ink and blending brushes. Then the masks removed and replaced to create a new area to sponge in a different colour. The circle mask I left there during that process of colouring the background. I’ve then simply used a ruler and black marker to draw the lines in between each colour.
It looks a whole lot more complicated that it really is. Masking is one of my favourite stamping techniques.
And just to add to all the masking going on, I decided to mask the sentiment which comes from the Sending Smiles stamp set, they are two different stamps, I’ve masked half of the strip of cardstock and stamped the word birthday, then masked over the stamped word, and stamped the word hugs.
The colours used are Azure Afternoon, Granny Apple Green, Lemon Lolly, Crushed Curry, and Flirty Flamingo.

Come on over to The Crafty Addicts challenge site where you can see what the rest of the Design Team have made this month. And do share your creations, we love to see what you’ve been crafting.
Happy stamping
Chris

You can click on the images below to go to my online store or click here, or if you prefer to use your device with the QR Code, you can find it below. Don’t forget about the amazing joining offer, if you live in Australia I would love to welcome you to my team, feel free to email or leave a comment if you would like more information.

Product List

Links by TheseAreMyStamps.com

Global Design Project Colour Challenge

I saw these colours and knew straight away that I had to play along, what a delicicous colour combination! And most of you know by now that I love, love, love a challenge.

I have added some Crumb Cake and White to these colours and featured the Gorgeously Made Dies, paired with the Artistic Mix Decorative Masks.
I have used the Decorative Masks to first put a wash of the Azure Afternoon colour across most of the Basic White layer, and then using a different mask, have overlaid the existing colour with the three different colours, Azure Afternoon at the top, Blueberry Bushel in the centre and Berry Burst towards the bottom.

I am just loving the subtle effect that these Decorative Masks can be used for, and for some more dramatic effects as well. I have some more ideas to share using these, so stay tuned for that.
And in the meantime, if you are looking for more ideas using this great colour combo, head on over to Global Design Project where there are some gorgeous projects.

Happy Stamping
Chris

If you live in Australia and would like to order Stampin’ Up! products from me, click here to go straight to my online store, or click on the images below. Alternatively, use your device to scan the QR code below.
And don’t forget about the amazing joining offer available in June, I would love to have you on my team.

Product List

Links by TheseAreMyStamps.com

Foursquare Decorative Masks

I prefer to call these Stencils, I think that’s what they always used to be called. Whatever you prefer to call them though, these are an amazing and versatile tool for making all sorts of papercraft projects.
My card uses these masks, as well as the technique of masking to create a card that looks like it has three panels on the front, but is, in fact, just one piece of Basic White cardstock.

I have masked off the three sections first, and sponged ink through the Decorative Mask with Fresh Freesia, Coastal Cabana and Daffodil Delight inks using Blending Brushes.
I have then inked the image from the Quiet Meadow Stamp set with Tuxedo Black Memento ink, and masked off the outside of the three panels before stamping.
The images have been very lightly coloured using Stampin’ Blends, as have the Rhinestone Jewels.

I am having a lot of fun with these Decorative Masks, and I am also in the process of creating a Tutorial / Class featuring them, so watch this space for that.

Happy stamping!
Chris

Product List

Links by TheseAreMyStamps.com

You’re A Peach

Today I have been playing with the Embossing Paste for the first time, trying a few things out and experimenting, which is always fun.

This card is made up almost entirely of the You’re a Peach Designer Series Paper, with the only stamping being the sentiment.

Behind the peaches, on the green background, I have created a little bit of texture by putting some of the paste directly onto the DSP through one of the Decorative Masks. It’s quite subtle but adds just a little extra interest. Here’s a close up…

All the peaches and flowers were fussy cut from the Designer Series Paper.

So there is my first play with the paste. Stay tuned for some more!!

Happy stamping!

Chris