Annual Catalogue Sketches – Sketch #3

Hi and welcome back to the August month of sketches, where I am sharing my inspiration on the sketches on Page 22 of the Stampin’ Up! Annual Catalogue.
Here is Sketch # 3.

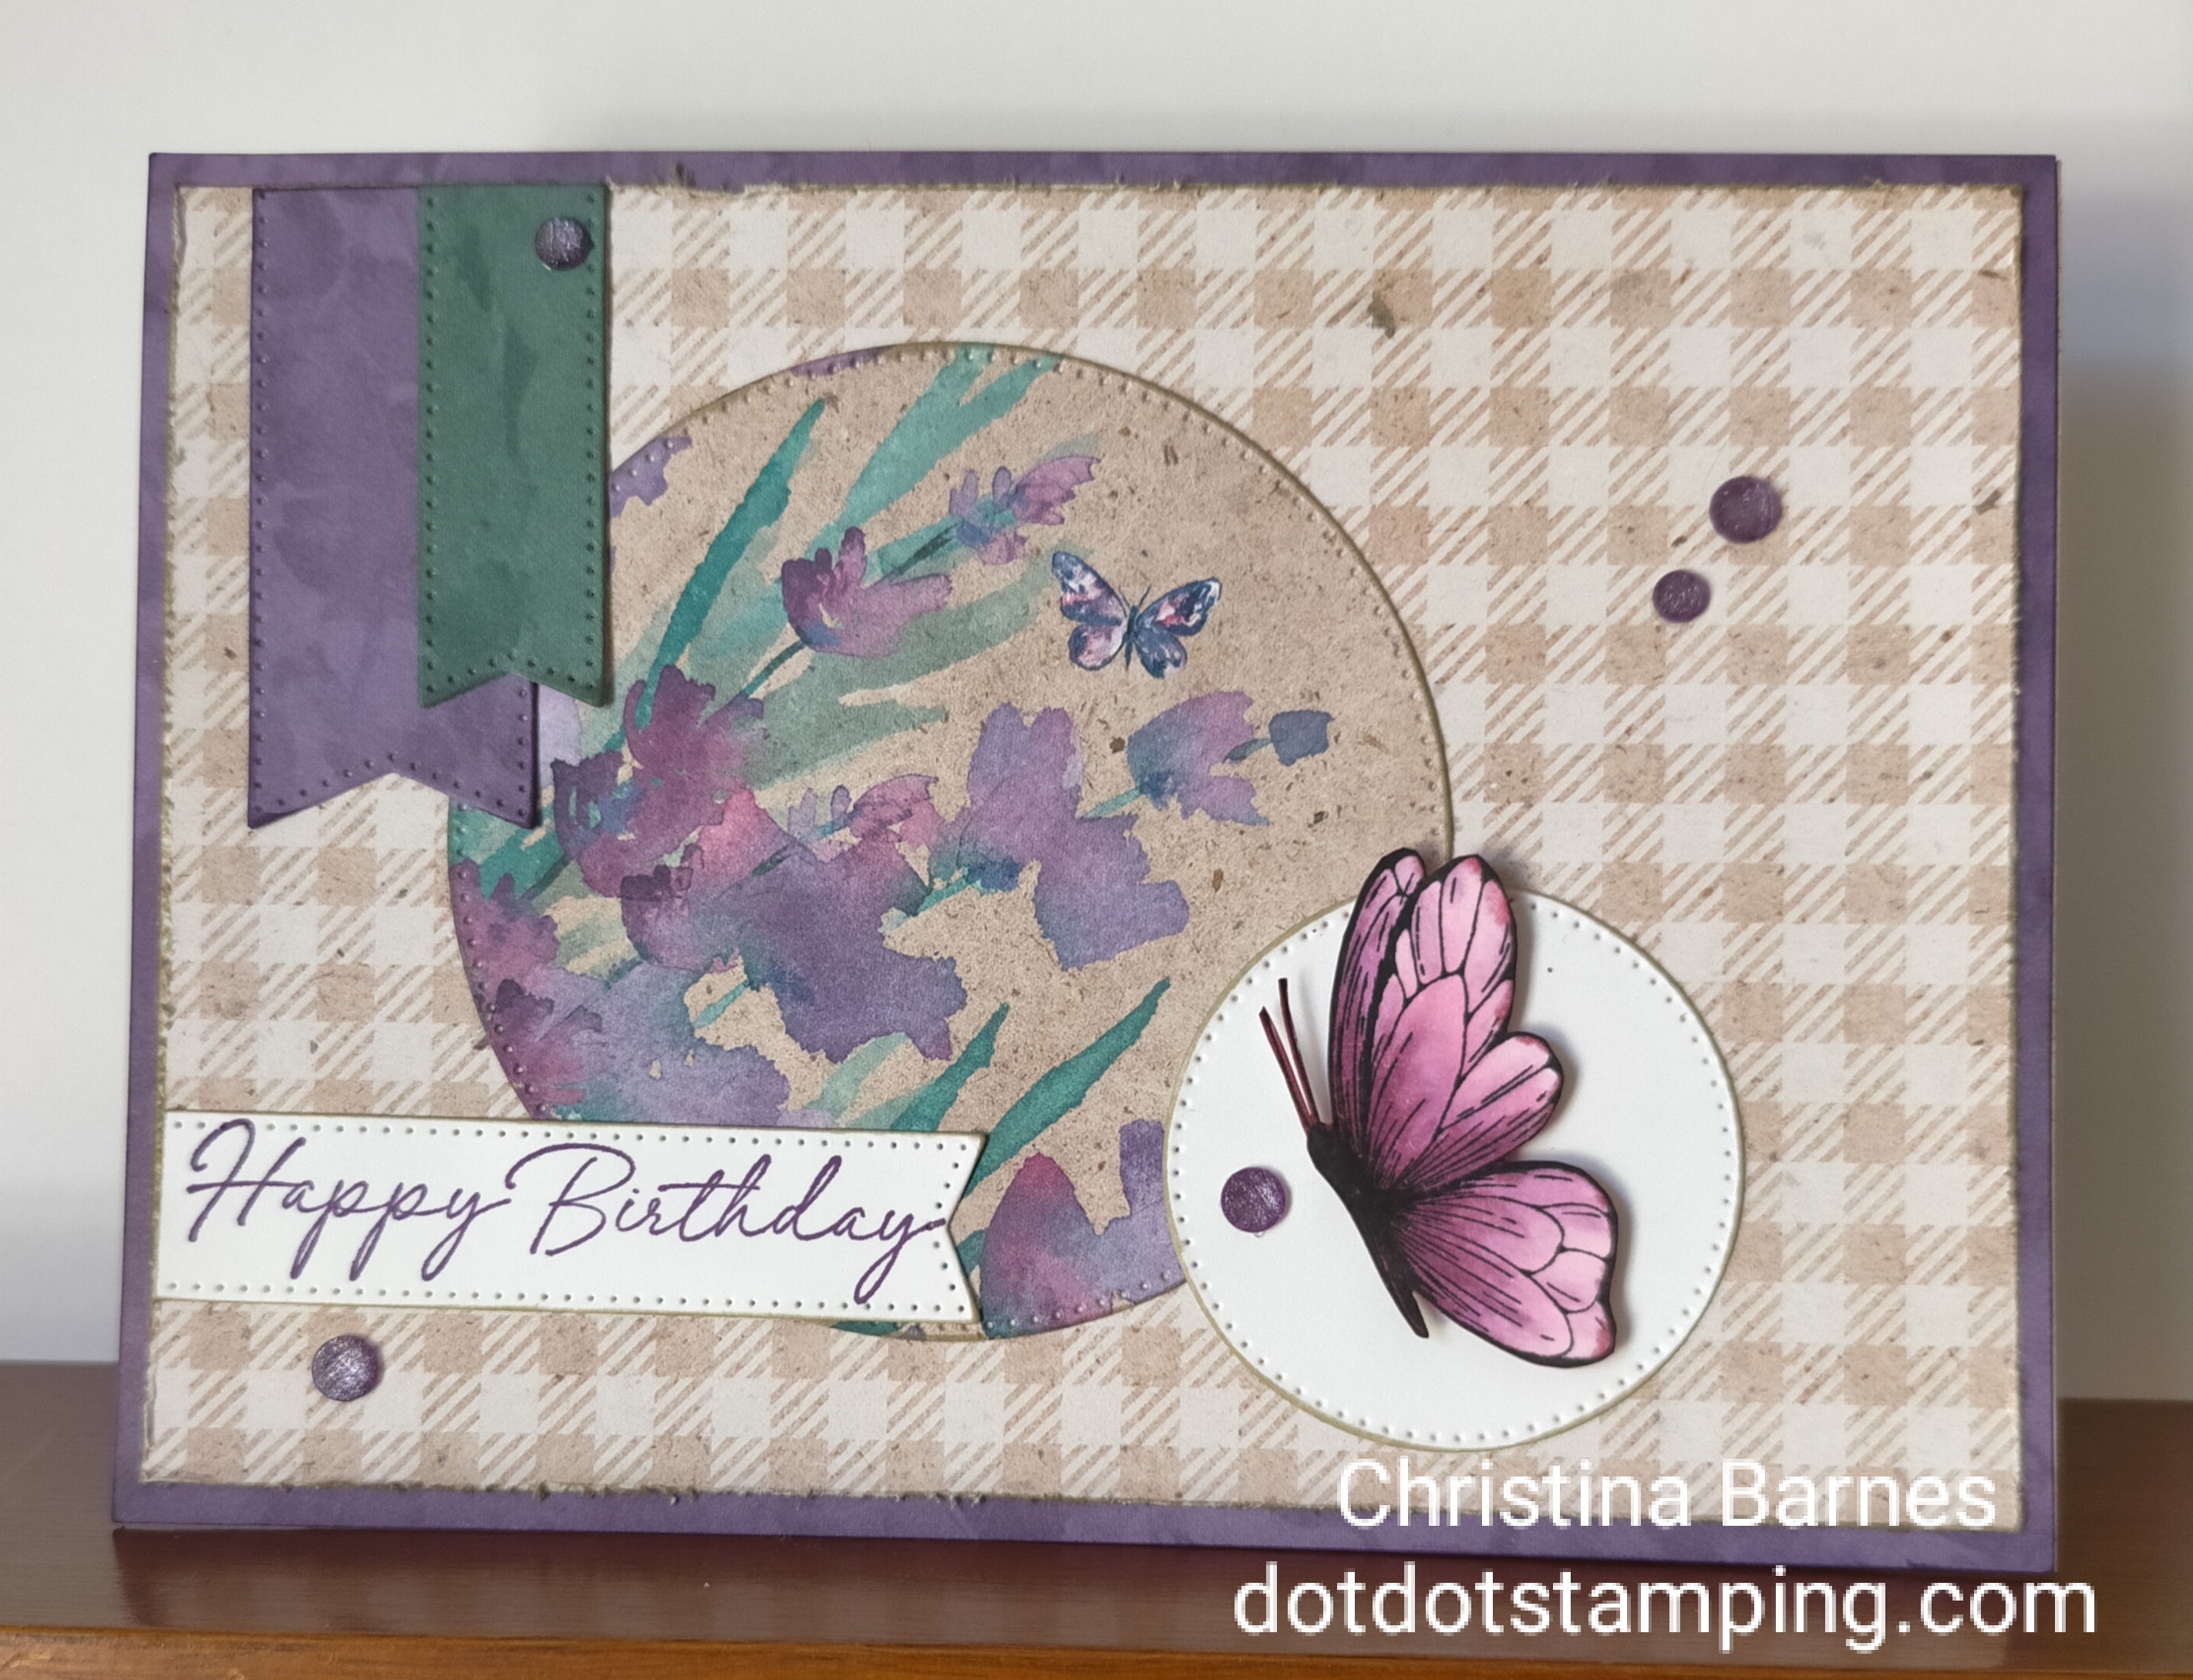
I have chosen to use some of the Lily Pond Lane Designer Series Paper which I have cut into strips measuring 13.5cm x 2.5cm.

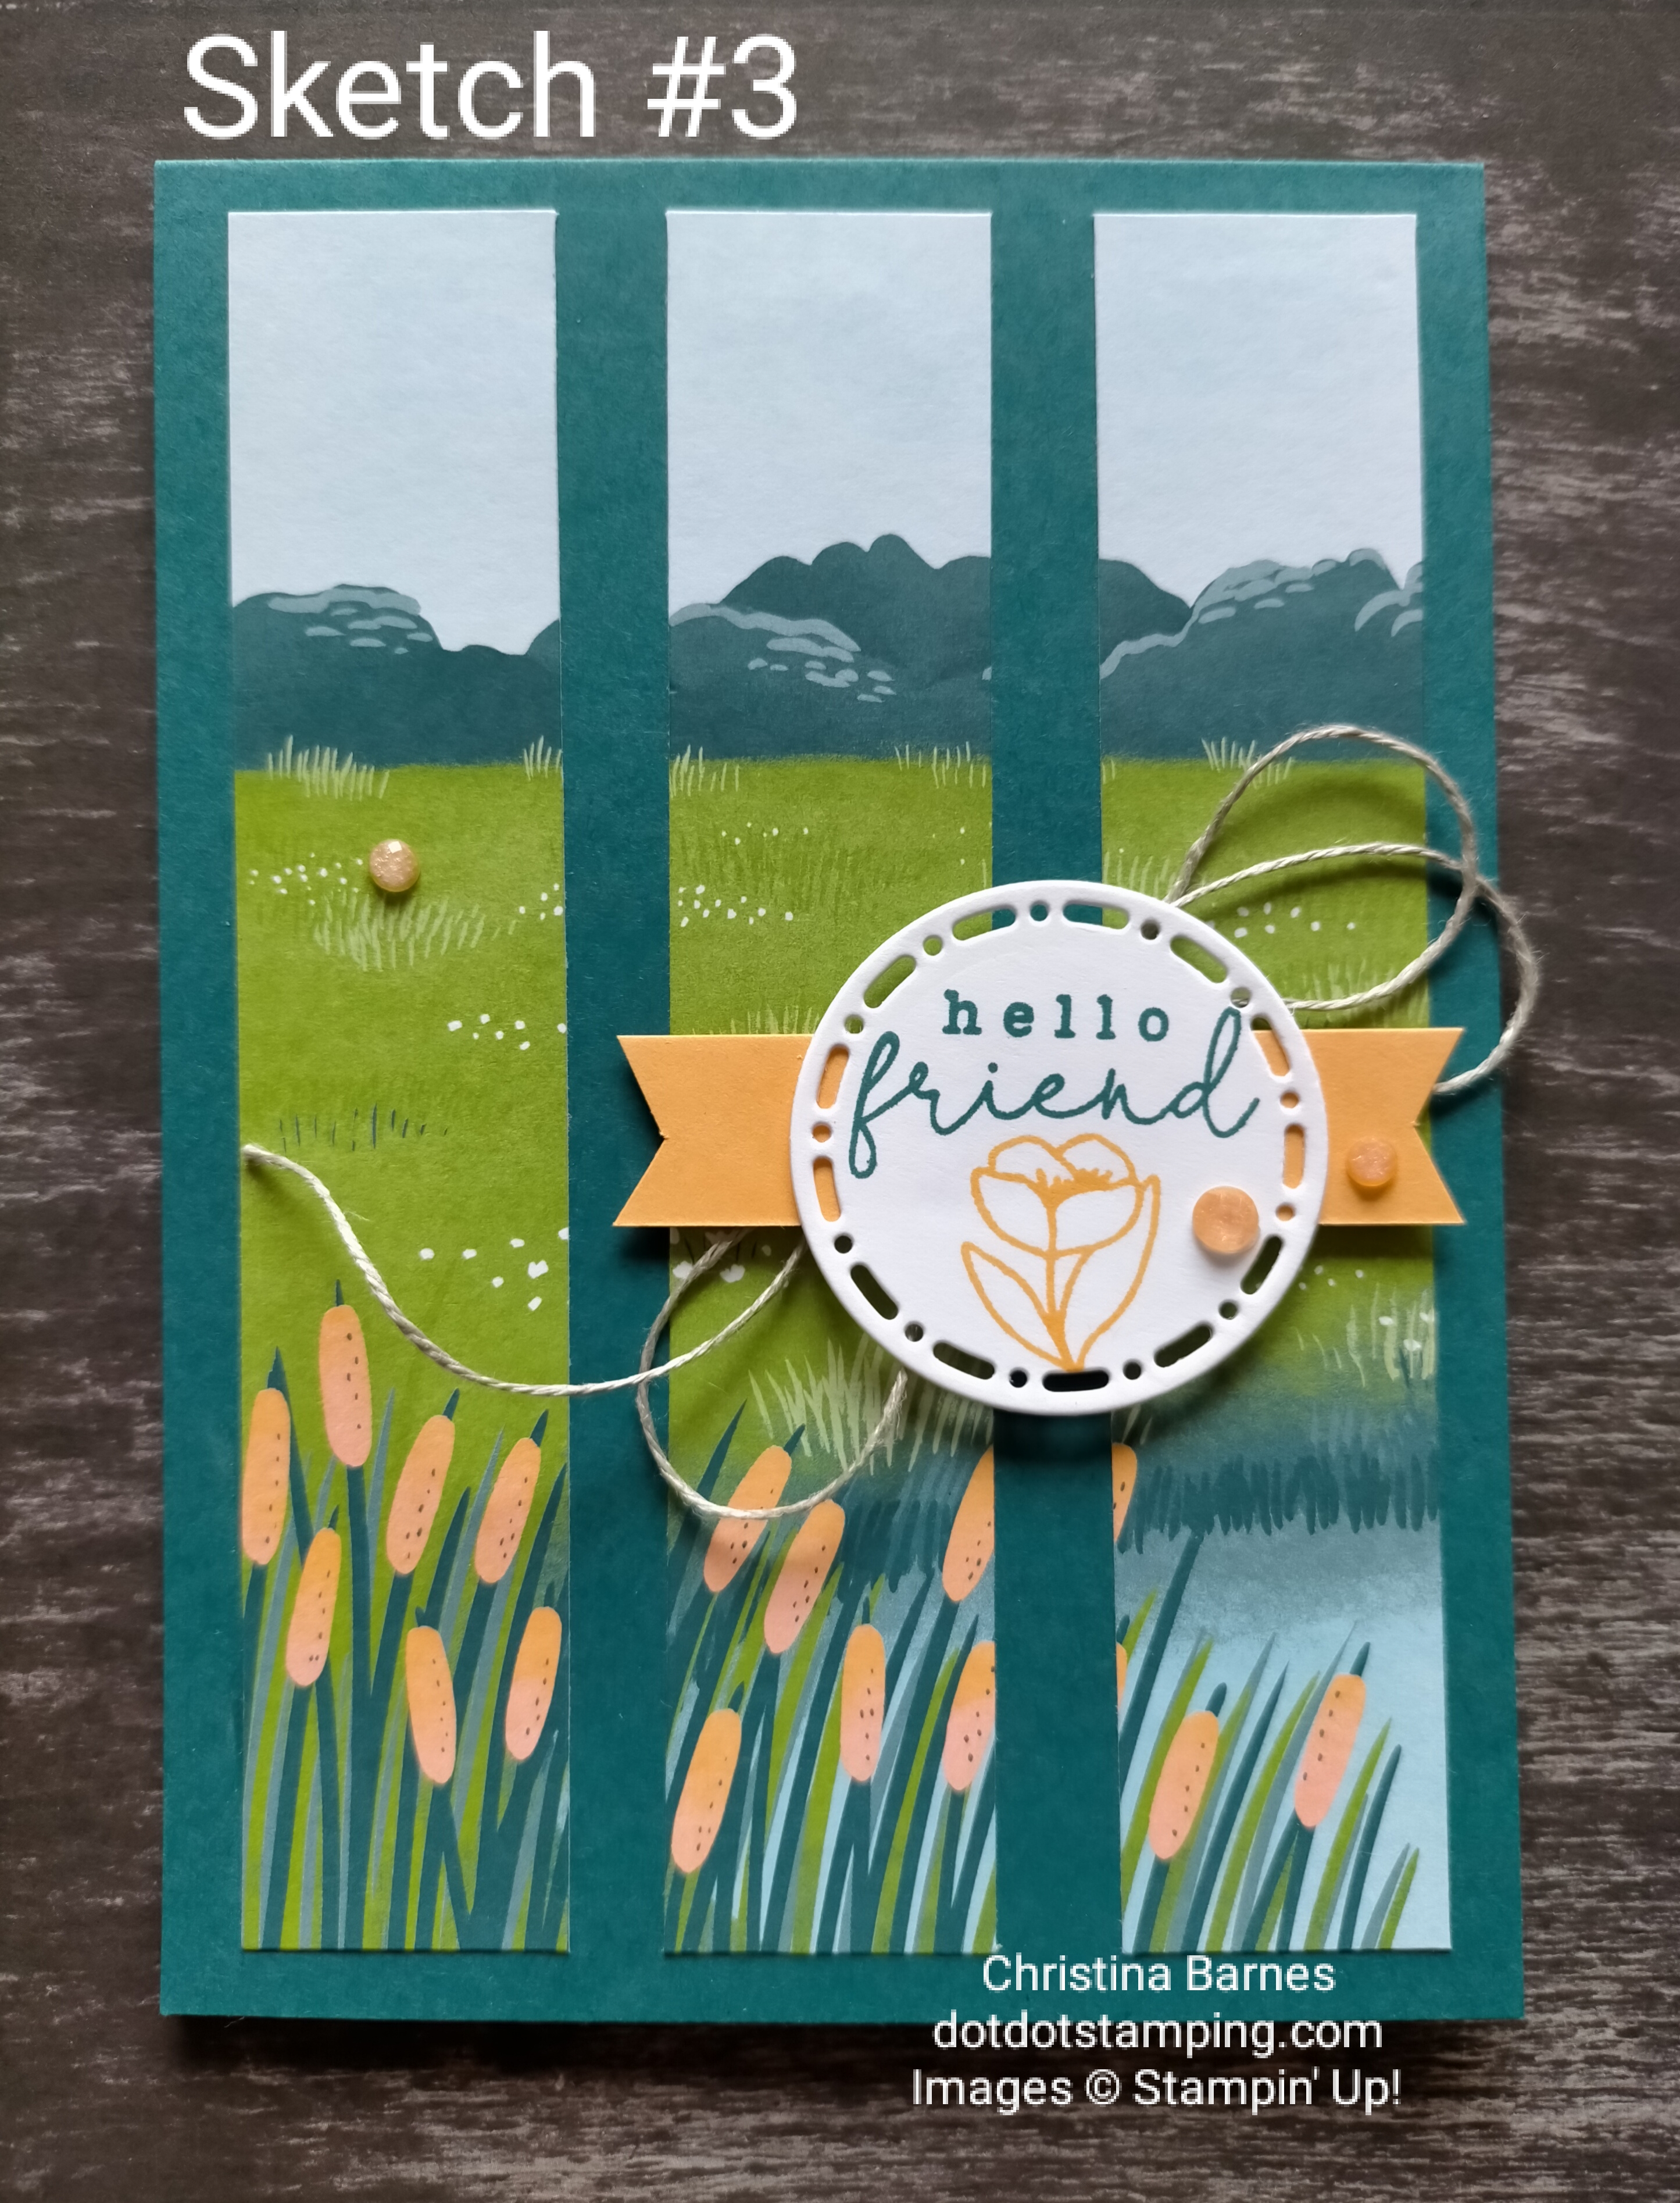
The Lily Pond Lane DSP is over my card base of Pretty Peacock cardstock.
For this card I have created a top opening cardbase, the measurements are 10.5cm x 29cm, then scored and folded along the long side at 14.5cm. Again, you can get two card bases out of one sheet of A4 cardstock.
Instead of wrapping ribbon or twine around the whole card front I chose to create a flag out of some Peach Pie Cardstock, with some Linen Thread behind it.
My sentiment is stamped onto a circle of Basic White Cardstock which has been cut using the Spotlight on Nature Dies. The sentiment and flower are from the Country Birdhouse stamp set, the sentiment stamped in Pretty Peacock ink and the flower in Peach Pie ink.
And to add a touch of bling, some Peach Pie coloured 2024-2026 In Color Shimmer Gems.

Make sure you keep an eye out for tomorrow’s sketch #4. Did you know that you can sign up to receive my blog posts by email? If you look on the far right hand side and scroll down until you see “Follow Blog via Email”. Just pop your email address in there and follow the instructions and you will receive all of my posts in your inbox.

Happy stamping,
Chris

Annual Catalogue Sketches – Sketch #2

Welcome back to day 2 of our month of Stampin’ Up! Annual Catalogue sketches. Below is today’s sketch.
You can find Day 1 of the month of sketches here.

This could be a very simple card or it could be more complex as I have made mine today. My card features the Changing Leaves bundle which is an Online Exclusive, and a very versatile bundle.

For my card base, I cut a piece of Lost Lagoon cardstock at 21cm x 14.5cm – you should be able to get two card fronts from one full piece of cardstock. Then along the long side, score at 10.5cm and fold, so when it’s folded, your card front will be 10.5cm x 14.5cm.
I have then used some Pretty Peacock cardstock which is 9cm x 13cm, and have run that through the Changing Leaves embossing folder.
The basic white sentiment has been cut with one of the Changing Leaves Dies and the sentiment itself, also from the Changing Leaves stamp set is stamped in Pretty Peacock ink.
The leaves are in Lost Lagoon, Moody Mauve and Copper Clay cardstock. And of course some Linen Thread tied into a large bow and adhered to the back of the sentiment.
If you wanted to keep it simple though, you could leave off all the leaves, and just use the embossed panel with a sentiment and bow.

Happy stamping,
Chris

August is Sketch Month – Sketch 1

Hi and welcome back.
If you have seen the Stampin’ Up! Annual Catalogue, you may have seen that there are quite a number of card sketches through the catalogue, and on Page 22 there are 22 sketches to use as inspiration for cards.
So I am challenging myself!
I plan to share a blog post every day with the sketches in the order they are in the catalogue, along with a sample of how I made that sketch PLUS the measurements I have used.
I have seen a few different people sharing PDFs of the sketches with measurements in Imperial, but I am in Australia, and we use different size card fronts here. So my measurements will be in centimeters and based on our card size.

I have been busy on Canva recreating the sketches from the catalogue, so they are not exact copies of what is in the catalogue but close enough. And since I have put my time and effort into creating these I would appreciate acknowledgement of where you got them from if you plan on using them.

I hope you enjoy them. Here is the first one!

My card using this sketch features some of the beautiful Designer Series Paper which was only available to Stampin’ Up! demonstrators (but is too beautiful not to share) along with the Poised Peony stamp set.

In Australia our card bases are basically half of an A4 sheet of cardstock.
However, I have found that it is much easier, especially for beginners to measure it slightly differently, and have a small strip left over.
So for my card base, I cut 21cm x 14.5cm – you should be able to get two card fronts from one piece of cardstock. Then along the long side, score at 10.5cm and fold, so when it’s folded, your card front will be 10.5cm x 14.5cm. I have used some Pretty in Pink cardstock for my card base.
I have then taken a piece of Designer Series Paper (patterned paper) the same size – 10.5cm x 14.5cm and adhered it onto the card front.
The next layer of Designer Series Paper (the darker pink) is 8.5cm wide x 9.5cm.
The Basic White focal layer is 7cm x 9.5cm.
I decided not to put my sentiment onto a separate piece but rather to stamp it directly onto the panel with the main image, and also to add some Linen Thread, and some Purple Fine Shimmer Gems.

I hope that these will be helpful to someone, and hopefully I can get through all of them for you.
Please feel free to leave a comment or reach out to me if you have any questions.
Happy stamping,
Chris

Sketch Saturday # 756

Welcome to another Sketch Saturday challenge.
Here is the sketch for this fortnight.

I chose to turn the sketch on it’s side for my project today, and I have used it as inspiration for a covered notebook.

The notebook front and back have been covered with some Country Woods Designer Series Paper, and I have cut the two blue strips from the same paper before using my Paper Snips to cut flag ends into the strips. I have then run them through the Stampin’ Cut and Emboss machine with the Distressed Tile Embossing Folder and then added some Night of Navy ink along the edges and randomly on the front of the blue panels.

The feature image comes from the Poised Peony stamp set. I have stamped the image in Night of Navy ink, and then coloured it using a Blender Pen and some of the Soft Pastel Assortment. Since the colouring has been done on Basic White Cardstock, I did this very gently in a dabbing motion to ensure the cardstock doesn’t rough up.
I have taken some pieces of Linen Thread, and coloured them using the dark Highland Heather Stampin’ Blend, and then pulled the strands of the thread apart to give it a more whispy look.
Then I’ve added some leaves in Copper Clay, cut using the Online Exclusive Changing Leaves Hybrid Embossing Folder and Dies, along with some leaves from the Stippled Roses Dies in Soft Seafoam and Highland Heather.

Here is the notecard I made to go with the Notebook, using the same elements and techniques.


I hope you will join us and share your take on the sketch, we always love to see what you have been creating.
Happy stamping,
Chris

Spotlight on Spring

Another seasonal inspired card today, to go along with the current challenge at Craftin Round The World, this time Spring inspired, and I have featured the Spotlight on Nature stamp set and Dies for my card.

In the background is some of the Country Woods Designer Series Paper and I’ve also used the Fun Patterns embossing folders to create some texture.

The flowers and leaves have all been coloured with watercolour pencils and then fussy cut.
Yes, there’s a lot of fussy cutting there.
So what’s the trick to fussy cutting? (fussing cutting is cutting around an image using scissors rather than using a die to cut). The trick is to move the piece you are cutting, rather than moving your hand around the piece, so keep your scissors in one direction as much as possible, and move the piece of cardstock, paper or whatever else it might be. I’ve found that to do this successfully I need to keep the piece of cardstock as small as possible, so I usually do two cuts, one to reduce the size and then one around the image.
The other trick is to make sure your Paper Snips (scissors) are nice and sharp.
And I enjoy fussing cutting, I find it quite relaxing, a little like meditation.

Happy stamping, and happy crafting.
Chris

Stampin’ Up! Translucent Florals

I’ve had the Translucent Florals stamp set and dies for quite some time now, and for whatever reason, it hasn’t had a lot of use, so I decided to give it some love.

My card is inspired by design of the card on the bottom left of Page 124 of the Annual Catalogue, and I have used a circle of flowers intead of an actual round shape.
My background was sponged using Azure Afternoon ink, and each flower petal was sponged with Crushed Curry ink around the outside edges, and Poppy Parade ink in the centres. There are four die cut flowers layered over each other for each complete flower.
The other colours used are Lemon Lime Twist for the leaves, and the sprigs of greenery are stamped in Summer Splash ink.

For each flower, I have die cut two large and two small flowers from Basic White cardstock, sponged the ink colour onto each one, and then used the Bone Folder gently to the the petals a little shaping. I have used Glue Dots to adhere the layers together and popped a Poppy Parade die cut centre and Iridescent Faceted Gem in the centre of each flower.

I hope you are having a crafty weekend.
Don’t forget the Earn and Redeem promotion that is on until the end of the month. Grab the Translucent Florals Bundle and you will be emailed a voucher to redeem in August.
Happy stamping,
Chris

A Summer Scene

The idea for my card today was to create a summer scene. It’s the middle of a cold winter here in Australia, and I needed a reminder that summer will be here before we know it, and with that, time at the beach and swimming in our beautiful ocean.
Does anyone else love swimming in the ocean? It’s something I love to do, it makes me feel so energised and refreshed.

I have used a piece of Fluid 100 Watercolor paper and a Water Painter to create my background, first applying a lot of water to the paper, and then adding some Pecan Pie ink at the bottom, then Pool Party, Summer Splash, Azure Afternoon and Blueberry Bushel inks.

The truck with the surf board in the back, and the palm trees are from the Trucking Along bundle, which is an Online Exclusive from a while back but still available here in Australia.

If you would like to share a project with us at Craftin Round the World Challenges, please join us here, we love to see what you have been creating.

Happy stamping!
Chris

Product List

Links by TheseAreMyStamps.com

Craftin’ Round The World Challenge

Welcome back. Today I am sharing a card I made for this month’s Craftin’ Round The World Challenges.

I’ve made a Winter themed card for this challenge, and since I am in Australia, we are in the middle of winter now. Winter is not aligned with Christmas for us here, so I wanted to make a winter card that is not also a Christmas card.

I have used some of the retired One Horse Open Sleigh Designer Series Papers along with a piece of Die Cut fence from something else that retired some time ago – sorry, I can’t remember what the name of that one was. Sometimes it’s good to use up those random bits and pieces that are around.

We love to see your creations, so come and share your projects with us. Craftin’ Round the World is a Facebook group that is closed, so is a safe place for you to share your projects. Come and join in the fun.
The link to the group is here.

Happy stamping!
Chris

Don’t forget the Earn and Redeem promotion that is happening for the rest of July – simply spend $90 and receive a $9 coupon to spend in August,. Scan the QR Code below or click here to go to my online store.

Bonus Days Earn and Redeem

Here it is! Everyone’s favourite Stampin’ Up! promotion. Well, maybe equal favourite with Sale-a-Bration.
The Bonus Days Earn and Redeem means that you get a delayed 10% off everything!
All you need to do is spend $90 and you get a coupon for $9 to spend in August.

Spending $90 on gorgeous products that make crafting a breeze is, well, it’s a breeze.
Especially with the release today of a ton of new Online Exclusive products which include some Christmas goodies, so that you can get a head start on your Christmas projects. AND some new kits as well.

Here’s a little sneak peek of some of the new Online Exclusives, but make sure you head on over to my online store to check out all of what’s on offer.

So, if you are in Australia and would like to make the most of this great promotion, either scan the QR Code on the photo below, or click here to go directly to my online store.
Make sure that you keep a copy of the email you will receive that gives you your coupon code to redeem in August.

Happy shopping!
Chris

Sketch Saturday #754

I have some exciting news to share with you today, I am honoured to have been accepted as a member of the Design Team for the Sketch Saturday Challenges, and today is my first post as a member of the Design Team.
This week’s challenge is to choose a previously used sketch, and I have chosen the one below, Sketch 555 from 2019.

I have used the Perennial Lavender Designer Series Paper as a focus for my card today, and the gorgeous butterfly from the Spotlight on Nature stamp set.

The butterfly has been coloured with Stampin’ Blends, in various pinks and purples.

I hope you will come and visit us at Sketch Saturday Challenges, and share your own version of the sketch, we love to see what you have come up with.
Happy stamping!
Chris

Product List

Links by TheseAreMyStamps.com