Annual Catalogue Sketches – Sketch #6

Hi and welcome back.
Today we have Sketch #6 from the Stampin’ Up! Annual Catalogue.

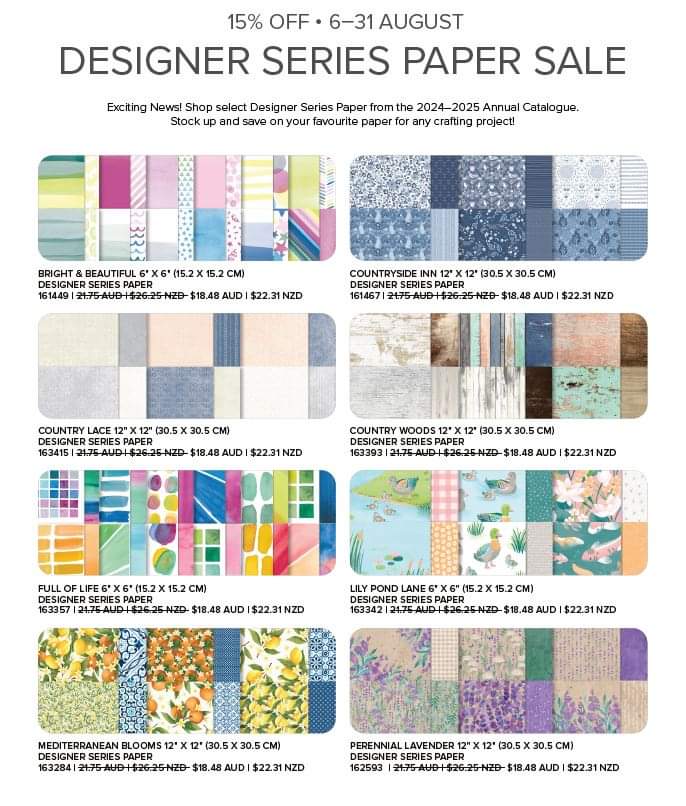
My card today features the Country Woods Designer Series Paper which you can get at a discounted price for the rest of August, while stocks last. And I have combined it with the Country Flowers Bundle to make a Sympathy card.

I have taken a piece of the Country Woods DSP, cut to 10cm x 14cm to lay over the top of my Crumb Cake card base (21cm x 14.5cm, which is then scored at 10.5cm on the long side and folded, so when it’s folded, your card front will be 10.5cm x 14.5cm).
The rectangular elements have been die cut using the Nested Essentials Dies, and the circle from the Spotlight on Nature Dies.
I have stamped the teapot image directly onto some of the Country Woods DSP, then cut using the die, before adding some shading using a Basic Grey Watercolour Pencil. The leaves were done in the same way and again coloured with Watercolour Pencils.

I found this sketch challenging for some reason, but so far I am enjoying creating using different layouts. I have a tendency to use the same or very similar layouts for my cards, so it’s a good challenge to be trying out some different ideas.

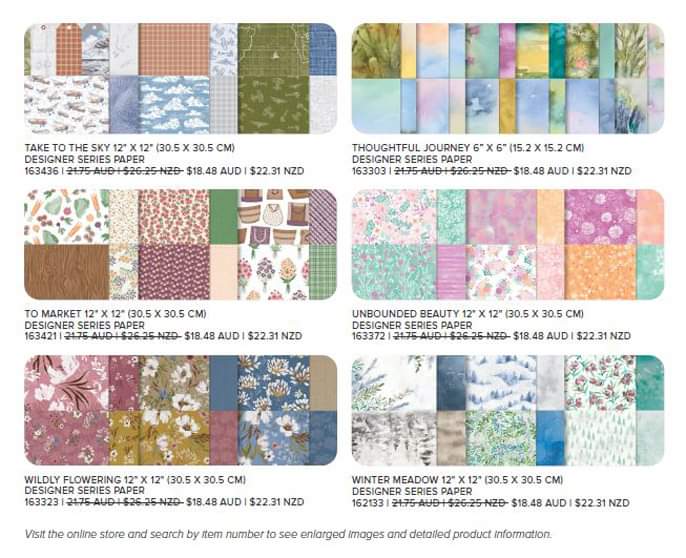
Don’t forget that Designer Series Papers are on sale at 15% off between now and the end of August, and you can order simply by going to my Online Store.


Happy stamping,
Chris

Just Add Ink Sketch Challenge

Hi and welcome back.
For those who have been following along with my blog posts for a while, you will know just how much I enjoy taking part in challenges, and I do particularly enjoy a Sketch challenge.
So I decided to use the current Just Add Ink challenge to inspire my card today. Here is the sketch:

My card features the mushroom image from the Inspirational Sketches stamp set.
I was a little sad when the new Catalogue first came out, I thought that this gorgeous stamp set had retired, but you will find it sneaks in with some images on pages 110 and 111.
I am very glad it’s a current stamp set, it’s a lot of fun to use.

I have used some Grey Granite cardstock as my base, and the background layer has been embossed with the Timber Embossing Folder, and then I have run the Grey Granite ink pad over it to highlight the embossed parts.
I have taken one of the large die cut circles from the Spotlight on Nature Dies, cut it in half, and then stamped the image in Grey Granite.
The red mushrooms were stamped in Black Memento ink, which I stamped off on scrap paper before stamping onto the cardstock, just to make the outline a little lighter. The image as been coloured with Stampin’ Blends in Crumb Cake for the stems, Ivory for the underneath of the mushroom caps, and Dark and Light Real Red.
And yes, the image was fussy cut (I love fussy cutting!).
The white dots….. there are several ways to achieve the white dots on the mushroom caps, which do make them look more realistic. If you have White Craft Ink, you can use a stylus, dip that into the ink on the ink pad, and dab it onto the image. You may have to do this several times to give a good coverage.
Alternatively, you can use a white gel pen or similar and that is much easier to do.
Did you know that Stampin’ Up! used to sell these? I’m talking way, way, way long ago in the deep dark past, not long after I first joined as a demonstrator. And believe it or not, I still had one that I bought from Stampin’ Up!. It doesn’t work any more, not surprising, since they do dry out after a while.
Perhaps it’s time to do a very big clean out.

Happy stamping!
Chris

Product List

Links by TheseAreMyStamps.com

CASE = Copy And Selectively Edit

Welcome back to all of my crafty friends. We had our first frost of the winter this morning, and even though the sun is out, the next door neighbour’s roof is still glistening in the sunlight.
I am so grateful for the lovely fire that is keeping me warm and cosy.


When I first joined as a Stampin’ Up! Demonstrator in 2008, I had done very little stamping or cardmaking, and my wonderful mentor, Larissa, told me to find cards I liked online, and copy them as best I could, with the items I had available. At that stage, I didn’t have much in the way of a papercrafting stash (oh my, how things have changed!), so I had to be inventive and creative, look at the card I was copying, and change it to suit what I had available.
That process is what we now term CASE-ing, (CASE = Copy and Selectively Edit) and I will be forever grateful for Larissa’s advice to do this, it started me out on this journey, and to me, this is still a fun way to get really creative but also a great way to find inspiration, especially when your Mojo has gone out the window! It is important though to make sure we credit whoever made the original card.
And so, onto my card today, and yes, it does once again feature the Stippled Roses stamp set and matching Dies. I may be a little obsessed with this stamp set.

The card that I have CASE-d is the one that goes across the spine on pages 122/123 of the Annual Catalogue. I loved the look of that card but wanted to add the gorgeous roses.
The roses have been stamped in Pecan Pie ink, and then coloured (of course! it wouldn’t be me without a little colouring) using Peach Pie ink and a Blender Pen, very gently dabbing the colour onto the shaded areas.
In the background, the leaves in Old Olive and Basic Beige are also from the Stippled Roses Dies, the Designer Series Paper is my new favourite, Country Woods DSP, the circle is cut from the Spotlight On Nature Dies, and the sentiment comes from the Stamped With Love set. Then to finish off I’ve added a few of the Peach Pie Shimmer Gems from the 2024-2026 In Color Shimmer Gems.

Make the most of the fantastic 10% discount on stamp set and die bundles through until the end of June. Bundles are already cheaper than buying the stamps and dies separately, so now you get that discount plus another 10% off. Great deal. You can shop online here.

Hoping you have a crafty day.
Happy stamping!
Chris

Product List

Links by TheseAreMyStamps.com