Christmas Gift Tag Class

Christmas Gift Tag Class

These are just a few of the designs you can make at this class.

Friday 2nd November at 10.30am

Saturday 3rd November at 2pm

Where: My house (details at time of booking)

Cost: $16

Make a stack of gift tags to go on your pressies for this Christmas, using a range of colours and images.  The class is suitable for all levels, and beginners are welcome.
Seating is limited, so please contact me asap to book your place.

Like to come along but the dates don’t work for you?  Why not get a group of friends, family and work colleagues together and I will bring the class to you.  Alternatively, contact me to see if we can work out another date for you and some friends to come to my place for the class.

Clean and Simple Kitchen

No, I am not asking you to go clean up your kitchen, it is this week’s challenge theme at Our Creative Corner.  Meihsia’s challenge is to create a Clean and Simple card featuring something you would see in the kitchen.

I have used the coffee cup from the fantastic Scentsational Season stamp set (page 16 Holiday Catalogue), and while this is definitely meant to be a Christmas set, I didn’t want to make a Christmas card this time, so I punched out the For You sentiment from the Mixed Medley stamp set, one of the new Hostess Sets in the Holiday Catalogue, and layered that over the snowflake image.  The image is cut using the matching dies, which can be bought in a bundle with the stamp set.
The patterned paper is from the Festival of Prints Designer Series Paper Stack, and also the woodgrain is from the Natural Composition Specialty papers.

So please join in this week, we always love to see what you come up with for our challenges.  The rest of the projects from the Design Team can be seen here.

Happy Stamping!
Chris

Fall in the Circle

This week at Our Creative Corner, Meihsia has challenged us to create a circle card or project with a Fall (Autumn) theme – Autumn colours or objects.
I really like this challenge, even though it is Spring here in Australia, I love Autumn colours and the leaves falling from the trees.  And I rarely make circle cards, so it was good to do something a little different again.
I have used the Scallop Circle Die to make the card base in Whisper White, then done a reverse mask to colour the centre area.  The tree is from Serene Silhouettes stamp set and is stamped in Black Stazon ink. The Stazon ink allowed me to sponge the background colours over the top, without the black ink smudging and blending in with the colours.
The bow is made with Always Artichoke Seam Binding ribbon which is held together with a Vintage Brad, and the leaves around the edge are from the French Foliage stamp set.  I have inked the leaves in one colour (i.e. Old Olive), and then sponged around the edge using a different colour (Riding Hood Red) using a sponge dauber.
I do hope you will join in with this great challenge, we love seeing the projects you have made using our challenges.  And make sure you check out what the rest of the Design Team have come up with.
Happy Stamping!
Chris

The Tango

There are some colours within the Stampin’ Up! colour families that I don’t often use, most of them seem to be yellows and oranges, so I took this week’s Dynamic Duos Challenge of using the colours Tangerine Tango and Old Olive.  Now, Old Olive is a long time favourite, but combining it with Tangerine  Tango, hmmmm.
But I am glad I had a go at this one, I am pleased with how it turned out and think I may be using this colour a little more from now on.
The image is from the Serene Silhouettes stamp set, which has been coloured with markers.  And I have used the Two Tags die and the Apothecary Accents Framelits, both very useful and versatile.


I hope this inspires you to have a go at using a different colour combination.
Happy stamping!
Chris

Cute Caterpillar

Just a short post today, but I wanted to share the cute little punch art caterpillar. Or is he a worm – perhaps a book worm 🙂

I have been incredibly busy just recently, with a lot of cards and gift tags going out to various charities for fundraising events.  I have one more lot of these to get done, but only a small one so that should be done this week.
I then have to focus on getting some things done for a display that I will be having at the Brighton Library in November.  So busy times for me, but it doesn’t mean I haven’t been crafting, just not doing much blogging.  I will do my best to keep you up to date though.
Happy stamping!
Chris

Let’s Be Royal

Our Creative Corner challenge for this week is a royal theme, and I had a real struggle with this one!

The requirements are:
– Create a card or project with a royal look using a crown, castle or a princess.
– Use the photo to inspire you.
– Your project must have something yellow or gold embossed.

Well, I don’t have any castle or princess stamps and the only crown stamp I have looks more like a jester’s hat than a crown!
So, I did a google search on princess images and decided to do some paper piecing, not something that I have done much of before.  Actually, truthfully, I have never done anything like this before so it really was a challenge!

Personally, I think she looks a bit evil, or angry, what do you think?
I have used patterned paper from the Floral District paper pack, and the Delicate Designs Embossing Folders to create the lacy underskirts, along with lots of fussy cutting and faux stitching.
I am not all that happy with the final result, but I guess for a first attempt it’s ok.
There is plenty of wonderful inspiration for this challenge from the rest of the Design Team though, so make sure you check it out, and lets see what you come up with – we would love it if you would share your creations.
Well, that’s it for now, but I will be back with some more real soon.
Happy stamping!
Chris

It’s a “Howdy” Challenge

This week’s Our Creative Corner Challenge comes from the lovely Liliana, who has picked a photo of a country scene as inspiration, with the following requirements:

-Create a card or project with a country or western look. Use the photo to inspire you.
-Your project must have something plaid or gingham (checkered/tartan is acceptable too!), such as in a ribbon, or designer paper.
-Most of all, have fun!

And here is the photo:

It took me some time to figure out what to do with this challenge, since I don’t really have anything “country or western” but ended up choosing this cute little cart image from the stamp set For the Birds (Page 34 of the Annual Catalogue).  I decided this could easily be something you would see in the country.  Well, anyway, that’s my story and I’m sticking to it!
I just adore this stamp set, it was on my “absolutely need to have it” list when the new catalogue came out.
The image has been water coloured in colours to match the stripey mount, which is made with the Orchard Harvest Fabric (Page 30 of the Holiday Catalogue).  The dark background layer has been embossed using the Woodgrain embossing folder, then just add some twine and one of the gorgeous new wooden buttons.
I do hope you will play along with us this week, so make sure you check out what the rest of the Design Team came up with here.
And if you have any questions about my card or the challenge, just send me an email.

I promise to return in the next day or so with some new projects, so stay tuned!
Happy stamping!
Chris

Photo Inspiration Challenge

My turn to set the challenge again this week at Our Creative Corner, and I have chosen a photo to inspire you!

What I would like you to do is, create a project of your choice which:

1. Uses something from the photo that inspires you, it can be colours, shapes, anything at all.
2. Use 2 or more buttons on your project, they can be real buttons, fabric buttons, covered buttons, die cut buttons, any sort of buttons!
3. And, use polka dots somewhere.

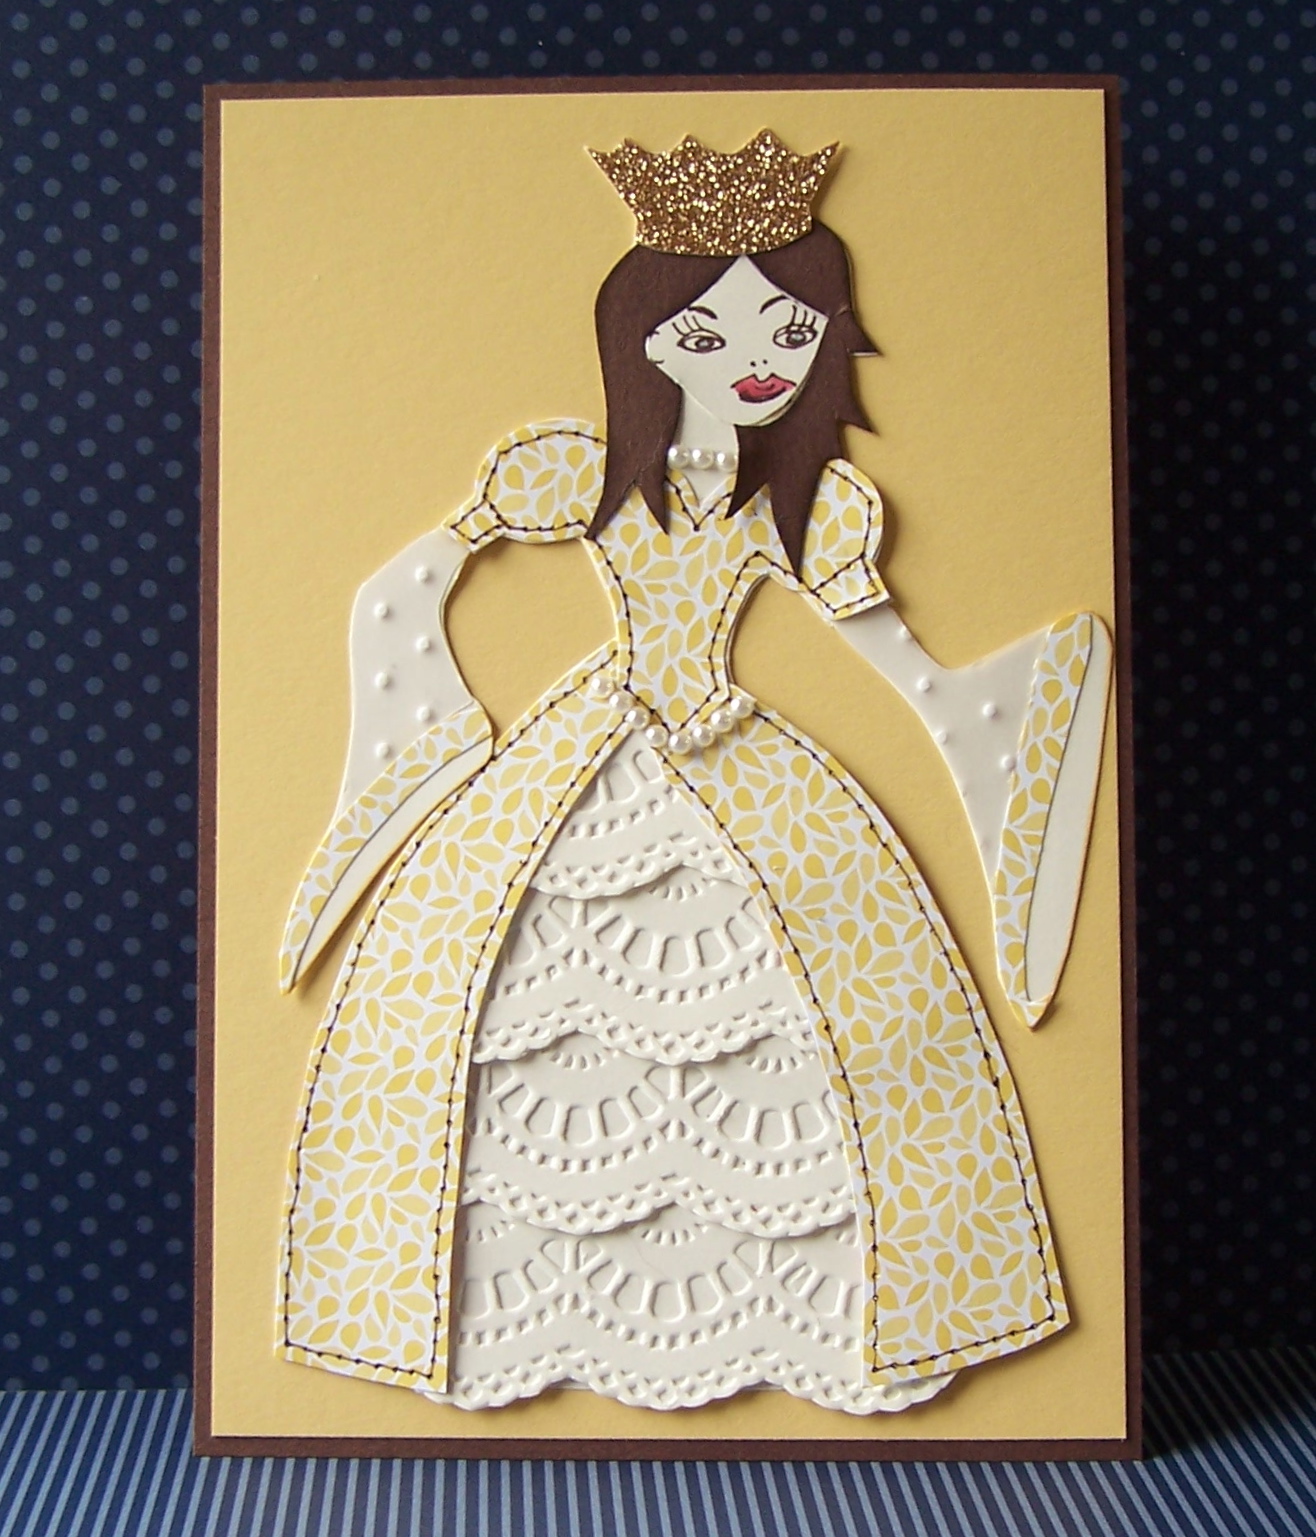
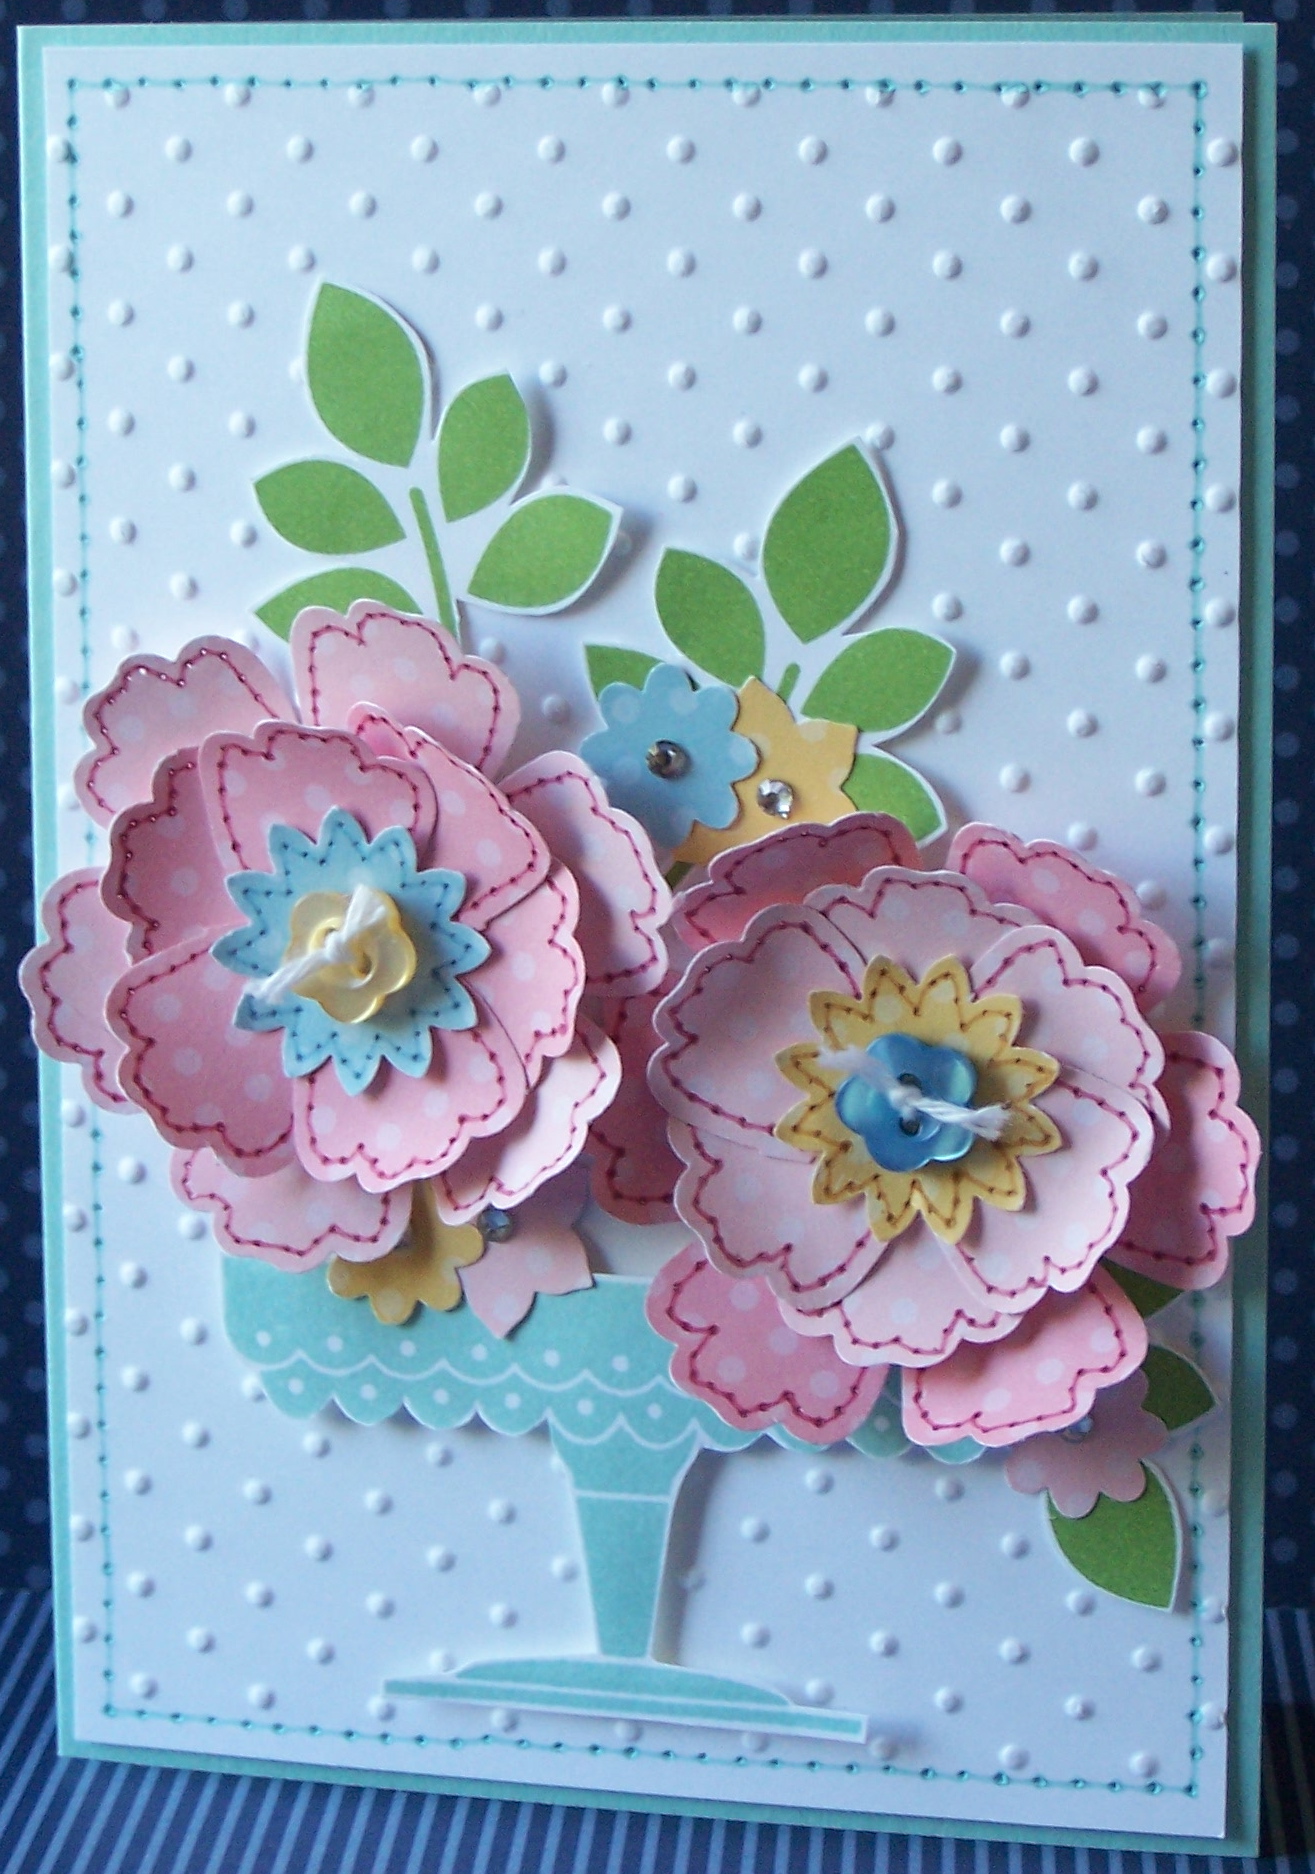
And here is my card.

I have taken the colours from the photo and also the cake stand, as inspiration.

I have used the polka dot papers from the Stampin’ Up! Designer Series Paper packs in Soft Subtles, punched them out using the Blossom Punch and Boho Blossoms Punch, and then done some free-hand paper piercing around each one, and then markers to create the stitched look. (For those of you who are regular visitors to my blog or my classes, you will know that I love my faux stitching!!)
The “vase” is from A Cherry on Top stamp set, which is a cute new hostess set (Page 197 of the Annual Catalogue) and the leaves from Betsy’s Blossom have been stamped in Gumball Green and hand cut.  And just to make sure it was really “polka dotty” 🙂 I have used the Perfect Polka Dots Embossing Folder for the white background.
Have a look at what the fabulous Design Team have created for this challenge, and I do hope you will be inspired to create something and share it with us.
For those of you on Facebook, we now have a new Our Creative Corner Facebook page, so why not drop in and give us a “like”.  🙂

Please feel free to email if you have any questions.
Happy Stamping!
Chris

Spring is here!

And I have made a card to celebrate spring!  This one uses the gorgeous Betsy’s Blossom stamp set along with a new set of patterned papers called Floral District.  The main image uses the “kissing” technique and has then been punched out using the Postage Stamp punch.
If you would like instructions on how to make this card, along with all of the bits and pieces needed to make it, just join my Stamp of the Month Club.  All the details can be found here and feel free to send me an email if you have any questions.

Happy Stamping!
Chris

Fundraising

Recently, I was asked to donate some boxed sets of cards for a charity fundraising event. I am very excited to be asked to do this, and wanted to make the box something a bit special, and I found this design on Tanya Bell‘s blog, and thought it was perfect. Thanks for sharing the tutorial for this one Tanya.

The white flap of the box opens up so that you can put the cards and envelopes inside.
For this particular box I have used Primrose Petals as the main colour, along with the Apothecary Art Stamp Set, the Framelits Labels Collection and some retired bits and pieces.  I have made two of these boxes and each has 6 of my hand crafted cards in it.
As well as that, I have also put together 250 advertising packs, each with information about my stamping business and each also has a gift tag inside.  I will show you the advertising packs in another post, but let’s just say it has definitely been a big project!
Hope you are having a crafty day.  Happy Stamping!
Chris