Secret Garden Scrap Page

Today’s page has been one of those that I have struggled with for quite a while.  I wanted to use the Secret Garden Simply Scrappin’ Kit for a scrap page as I think the colour combination is gorgeous, so when I came across this old photo it was the obvious choice.  But for some reason it just wouldn’t come together, and I am still not entirely sure that I am happy with it, but maybe I am just being fussy! 

Yes, the photo is of me, a very long time ago!! 🙂

Stamp Sets: Live Your Dream.

Cardstock: Whisper White, Almost Artichoke, and papers and stickers from Secret Garden Simply Scrappin’ Kit.

Inks: Cameo Coral, Old Olive.

Accessories: Markers, Paper Snips, Moss Gingham Ribbon.

Artwork by Chris Parker-Barnes

Images copyright 1990-2009 Stampin’ Up!

Scrappin’ Weather!

Like many other areas on the Eastern side of Australia, Canberra has recently had a long run of really hot weather, up to 38 degrees today, that’s over 100 Farenheit!  What better way to beat the heat, than to sit in air conditioned comfort and do some scrapbooking.  I made two pages today, and both of them use mostly non Stampin’ Up! products which is a big change for me, but nice to do something a bit different.

The first page is yet another photo of my gorgeous little boy.  The photo itself I have modified using Photoshop, I have given it a sepia look and then added a very light cross-hatch to give it a bit of a textured look.  The papers are from one of the latest range from Kaiser called Esther’s Guestlist.  The page also features lots of  paper tearing and distressing which is not something I normally do a lot of, however it was good to do something completely different.

 Products by Kaiser

Ink colours: Stampin’ Up! Chocolate Chip and Taken With Teal.

The second page today uses a series of photos of one of my three beloved cats, Millie.  Again, most of the products used are from Kaiser, and I have used quite a lot of rub-ons on this page, again, something I don’t normally use a lot of, but that might change after today 🙂

 Special thanks to the ladies at Wrapped In Paper for their help, knowledge, sense of humour and air conditioning!! 🙂

Christmas Scrap Page

Last night I had a “no stamp night”.  It was not planned that way, but everything I did was without stamping, just using cardstock, papers and punches plus a couple of extras for that finishing touch.

The first project was to make a Christmas page with some of my photos.  I had lots of fun with this one!  Hope you like it.

Cardstock:  Real Red, Holiday Harmony and Summer Picnic Designer Series Papers.

Accessories: Scallop Edge Punch, Scallop Square Punch, Scallop Circle Punch, Circle Punch.

Artwork by Chris Parker-Barnes

Images Copyright Stampin’ Up! 1990 – 2009

Yayyyyyy… another post!

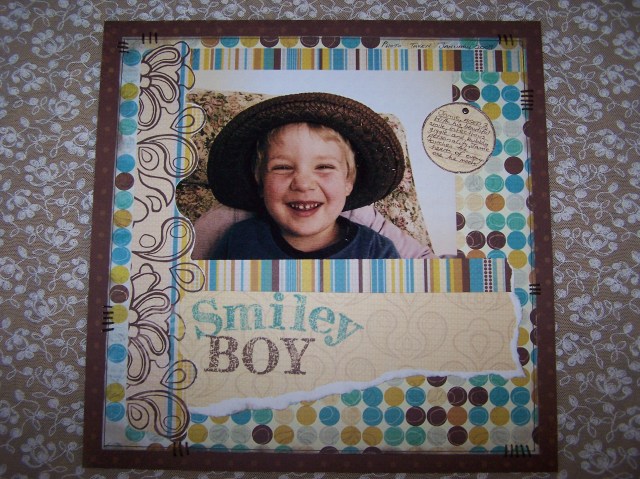
Now that things are starting to settle down after the silly season, I am finally finding some time to do some stamping etc and of course wanting to do something with all the gorgeous photos of my gorgeous little family which I have taken over the past few weeks 🙂   So some scrapbooking has been the order of the day, and what better way to start than with my lovely Jamie’s 3rd birthday photos.  He just loves having his photo taken, and is often making funny faces in the photos so sometimes it is a challenge to get a “normal” face.  I often find myself sneaking up on him, camera in hand, trying to take him by surprise so that he doesn’t have time to form a cheeky face, but I rarely succeed!  And “smiling” involves crinkling up his nose and closing his eyes tight so telling him to smile doesn’t exactly work either.     But…. on his birthday, he was so busy having fun that he forgot all about the camera, and here is the end result.  Such a cute boy! 🙂  I have yet to add the journaling but would rather not share that side of some of my scrap pages.  I had a lot of fun creating this page, and used heaps of different Stampin’ Up! products.

The Birthday BoyStamp Sets: Itty Bitty Background, Birthday Best, Live Your Dream.

Inks: Whisper White Craft Ink, Chocolate Chip, Ballet Blue.

Cardstock: Ballet Blue 12″x12″, Whisper White, Designer Series Paper Summer Picnic (from the 2008 Australian Spring Mini Catalogue).

Accessories: Corner Rounder Punch, Scallop Edge Punch, Stampin’ Write Markers, Stampin’ Pastels, On Board Lots of Letters, Rub-ons, White Gel Pen.

Jamie wasn’t really sure what all the fuss was about leading up to his birthday, he was just really interested in getting more presents.  And when I told him he would have a birthday cake, he said he wanted to help make our chocolate cake that we buy from Aldi.  He loves to help me with the cooking.  Easiest birthday cake ever! 🙂


Artwork by Chris Parker-Barnes

Images copyright 1990-2009 Stampin’ Up!

Sneak Peak

For those of you who didn’t get to the Regional Training Seminar in Sydney last weekend, here is one of the make and take projects we got to make using our brand new stamp set Live Your Dream.  This set won’t be available until December so try not to get too impatient.  But I love it, it is a really versatile stamp set (like so many of Stampin’ Up!s stamps) and I can’t wait to see what else will be in the new Mini Catalogue. 

I just had to put this on my blog and show you what a gorgeous little boy I have, and yep, you guessed it, he is cheeky as well as cute!

Stamp Set: Live Your Dream

Cardstock: Wild Wasabi, Chocolate Chip, Groovy Guava, Whisper White

Ink: Chocolate Chip, Wild Wasabi, Groovy Guava

Accessories: Soft Sky double-stitched ribbon, Chocolate Chip grosgrain ribbon.

Images copyright 1990–2008 Stampin’ Up!